Work with PDFs (Classic experience)
See also
Check your interface! If the screen below matches your app interface, you’re on our new and more intuitive interface. See how to View PDFs on new experience. If no, continue reading. 
You can use Acrobat Reader app to:
Edit PDFs (premium feature)
Organize pages in a PDF (premium feature)
Combine files (premium feature)
Compress files (premium feature)
Password-protect PDFs (premium feature)
When you open a PDF, the menu that appears can vary based on the file type. For instance, non-shared files display an action menu at the top of the screen and a floating action button at the bottom.
The overflow icon (![]() ) and the floating action button
) and the floating action button ![]() open a context menu displaying additional options based on your service subscriptions. For example, both Organize Pages and Edit PDF require a subscription.
open a context menu displaying additional options based on your service subscriptions. For example, both Organize Pages and Edit PDF require a subscription.

The top menu bar, context menu options, and the floating action button change based on the nature of the currently displayed file:
Regular files (non-shared): The top menu contains tools for changing the scroll mode, undo/redo, text search, share, and an overflow menu that provide access to tools for viewing comments, viewing bookmarks, printing, and actions associated with your subscription services.
Shared files (View only): An overflow menu provide access to tools for printing and managing the shared file.
Review files: Files in an ongoing review display the comment bar, the comment filter, and an overflow menu that provide access to tools for managing the review. The floating action button is not available.
You can tap the floating action button ![]() to take the following actions:
to take the following actions:
Open a file
Create a new scan
Edit PDFs
Create PDFs
Combine files

Save PDFs to Adobe cloud storage
Following files are automatically saved to the source cloud location:
A file that you update after downloading from the cloud.
A file that requires Adobe cloud storage features, such as share, reviews, combine files, export PDF, and more.
To save files stored on your device to the cloud:
Go to the Home file list or Files > On this device or open any file.
Tap
 and then tap
Mark PDF files as favorite
You can mark a file favorite by adding a star to it. Once applied, a star appears next to the file in the specified locations across all devices including your desktop. You can control the starred file location behavior with your Set starred file location settings.
To star a file:
Open the file.
Open any context menu.
Tap
 . A star now appears next to the file in the locations specified by your Set starred file location settings.

To unstar a file, open any context menu (usually by tapping ![]() ) and tap
) and tap ![]() .
.

View PDFs in different modes
You can enhance your PDF viewing experience by customizing the view mode settings. To do so:
Open a PDF file.
From the top menu, tap the view settings icon. The displayed icon represents the current view.
In the dialog that appears, tap one of the following scroll modes and/or night mode:
Continuous Pages: Swipe up or down on the screen to change pages. Choose this setting when marking up documents.
Page-by-Page: Swipe left or right to change pages, or tap the right or left document edge.
Reading Mode: The text reflows to fit the current view, which enhances readability for some documents. The objects that are recognized as images display on their own line with the width limited to the screen width. Zoom is disabled in reading mode so some images may appear partially off the screen. Note that all PDFs are not compatible with Reading mode, and the feature is gradually phasing in over 2020 (and therefor not available to all users).
Night Mode: Use Night Mode to invert black and white in low light conditions to reduce eye strain and extend your battery life.
Two page with cover page (Tablets only): On devices with 7-8” screens and tablets, you can choose to show only the cover page on document open.
To hide menus, tap on the file. It changes the view to immersive mode allowing you to see more of the document.

Note
You can also keep the PDF screen from dimming by enabling your device’s screen brightness lock.
Print PDFs
You need to set up a printer for printing PDFs. To print:
Open a PDF.
Tap
 >
>  Print.
In the Printer Options dialog, select a printer.
Set your printing preferences such as the number of copies, paper size, color, and more.
Tap Print.
If no printer is found, you will be prompted to save the PDF to your device.

Note
You cannot print password-protected PDFs from Acrobat mobile app.
Read aloud text
Acrobat supports Read aloud feature that allows you to listen to a document in the language of your choice. If your device is in speaker mode, connected to smart home device, or connected to earphones, the app prompts you to select the Read aloud option.
To access the Read aloud feature:
Open a file and tap

From the menu that appears, tap Read aloud.
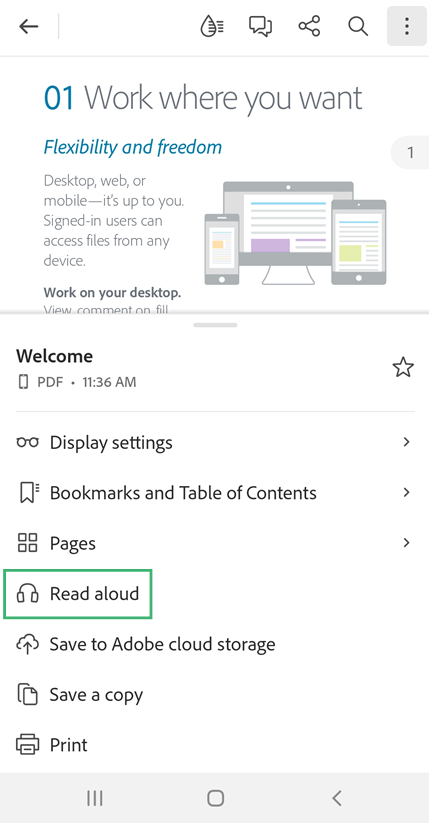
It opens the file in Read-aloud mode and the text is read aloud.
To pause the audio, tap the Pause button from the bottom menu. You can replay the audio anytime by selecting the Play button.
To increase or decrease the audio speed, tap the Speed control button.
To change the audio language, tap

Note: Read aloud text feature has certain limitations and may not be available to use in the following cases:
Unknown language
Password protected document
Non-OCR scanned document
Shared file with commenting enabled
Device audio features are enabled
Unknown reason
Edit PDFs
Users with a subscription to the edit service can modify PDF files. You can modify PDF files using one of the following methods:
Via Edit mode: To enter edit mode, tap
 > Edit PDF.
Via Context menu: To open context menu, long press the section that you want to modify and select the required action from the menu that appears.

Add text
To add new text:
In edit mode, tap any blank space to show the menu.
Tap

Tap the desired text insertion location and enter text.
Optionally, apply text formatting such as Bold, Italic, Underline.
Tap
 to save the changes.
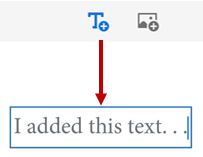
When you exit the add text mode, you can tap the text again and select a tool from the menu to change the font style, size, weight, color, and alignment.
Edit text block
To edit existing text, open edit mode and:
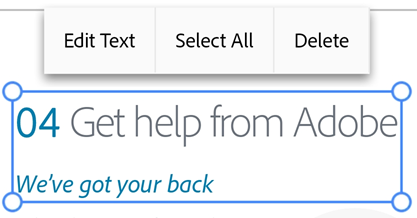
Tap a text block and take one or more of the following actions, as required:
To edit the text inside, tap Edit text. Next, Select a text tool from the edit menu to change the font style, size, weight, color, and alignment.
To select the text in the block, tap Select All.
To delete the text block, tap Delete.
To copy a text block, double tap inside the selected text and then select Copy from the displayed menu.
To resize a text block, drag the text box handles to change the text block’s size or location.
Tap outside the edit block to save the changes.
Edit specific text
To edit existing text via edit mode:
In edit mode, tap a text block.
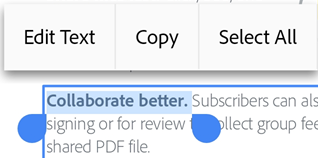
Double tap in the text block to show the blow handles.
Drag the handles to select text.
Select any text tool from the edit menu to change the font style, size, weight, color, and alignment.
Tap outside the edit block to save the changes.
To edit text via context menu:
Open the PDF and long press the text that you want to edit.
In the menu that appears, tap Edit Text.
Edit the text as required and then tap Save.
To discard your changes, select X from the top bar.
Insert lists
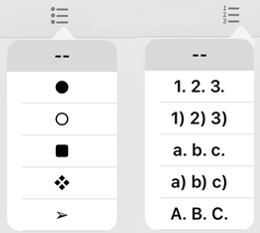
You can insert a new list or convert existing text into either a bulleted or numbered list. To do so, simply select text as described above and tap one of the list icons.
Add images
To add a new image to a PDF:
Open a document and tap
 > Edit PDF.
From the bottom menu, tap
 and then tap on a blank space on document where you want to add an image.
Note
Select users may have a quick access to the Image tool. If available: 1. Long press on a blank space on the document. 2. From the menu that appears, tap Image. 3. Follow the steps below.

From the add image panel, take one of the following two actions:

Tap Add from photos: If prompted, allow access to photos. It opens the recent image gallery. You may tap an image to select from there. To select images from other apps, tap on one of any of the app icons that appear on the top panel, and select any image.

Tap Add from Camera: If prompted to allow access to the camera, select a consent option, as desired. Next, focus the camera on the image and tap the capture icon. Once satisfied, select Ok.

It adds the selected or captured image to the document.
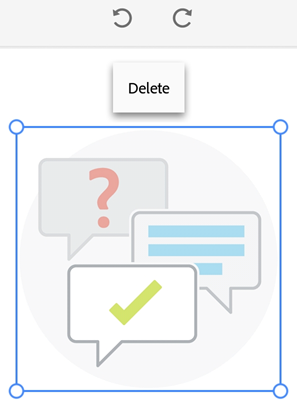
To modify the added image, tap the image and take one or more of the following actions, as required:
Drag it to a different location.
Grab a blue corner handle and resize the image.
Tap Delete to delete the image.
Edit images
You can delete, resize, rotate and move images. To do so:
Tap
 > Edit PDF.
Tap an image.
Long press an image and do one or more of the following:
Drag it to move to a different location.
Grab a corner handle and resize the image.
Tap Delete to delete the PDF.
Tap
 or
or  to rotate the image.
Tap outside the edit block to save your change.
Undo-redo edit actions
To undo and redo editing actions:
In edit mode, tap
 in the upper right to undo an action.
Long press the
 and tap
Note
When using an external keyboard, you can use the shortcut keys: Command + Z OR Command + Shift + Z

