|
Apply properties hierarchically
Earlier in the tutorial, you learned that an object's properties can be reordered to change its appearance.
Object properties can also be nested, or organized hierarchically. Changes in property hierarchy alter an object's appearance. The combined ability to reorder properties and to hierarchically organize them affords you innumerable possibilities when designing illustrations.
In this section you'll create a wavy path that represents the ink produced by the pen in the logo. To achieve a wavy calligraphic appearance, you'll define a property hierarchy.
Draw a path
Here you'll use the Pen tool to draw the path of the wavy line in the logo.
| 1 |
Using the Pointer tool, click in an empty area of the Document window to deselect any selected objects. |
| 2 |
In the Tools panel, click the Pen tool (or select it from its pop-up menu).
 |
| 3 |
In the document, click once near the bottom of the pen graphic. This plots the first point of the path you'll create.
 |
| 4 |
Move the mouse pointer to the location shown in the following illustration, but don't press the mouse button yet. A preview of the path appears. |
|
Tip: Hold down Shift while drawing the line to constrain it horizontally.
 |
| 5 |
Double-click the pointer to place a point and end the path. If you need to reposition the path, use the Pointer tool to move it. |
 |
|
Apply and edit a live effect
Next you'll use the Object panel to apply a live effect to the new path.
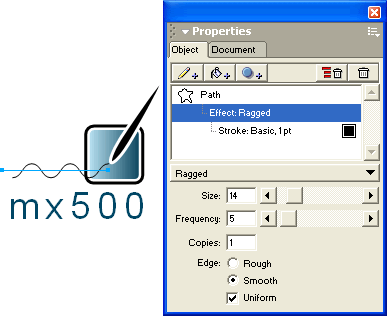
Live effects are enhancements that you can apply to objects to change their appearance. Live effects are considered "live" because they don't permanently alter an object; live effects can be modified or deleted at any time after they are applied.
| 1 |
With the path still selected from the previous procedure, click the Add Effect button in the Object panel, and select Ragged.
 |
|
The path in the document changes to reflect the effect you applied, and the new effect is listed as a property of the object in the Object panel Properties list. Live effects are properties of an object, just like strokes and fills. |
| 2 |
In the bottom portion of the Object panel, set the Size option to 14 and the Frequency option to 5. |
|
If you type values rather than using the sliders, be sure to press Enter (Windows) or Return (Macintosh) to apply the new values. This rule pertains to any option in FreeHand in which there is more than one way to specify a value. Many attributes offer text boxes, sliders, pop-up menus, or a combination. |
| 3 |
Select Smooth and Uniform as the Edge options. |
|
The path in the document changes to reflect the effect settings you modified.
 |
| 4 |
If the path appears to be flipped in the wrong direction, highlight the value in the Size text box and retype it, then press Enter (Windows) or Return (Macintosh). |
|
Tip: If performing this step doesn't flip the path the first time you try it, repeat this step until the path flips. Alternatively, drag the slider up or down a unit or two until the path flips. |
 |
|
Modify the effect's stroke
When you applied the ragged effect to the path, the path's stroke became a subproperty of the effect in the Object panel Properties list. This is an example of how you can create a property hierarchy using the Object panel. The hierarchy of an object's properties and the order in which they are applied affects the object's appearance.
Here you'll modify the stroke that's now a property of the ragged effect.
| 1 |
With the path still selected from the previous procedure, click the Stroke property in the Object panel Properties list. |
| 2 |
In the Color Mixer panel, set the Cyan value to 25, the Magenta value to 75, and the Black value to 0.
 |
| 3 |
Drag the new color you created in the Color Mixer panel to the Stroke property's preview swatch in the Object panel. |
| 4 |
From the stroke type pop-up menu in the Object panel, select Calligraphic. |
|
The Calligraphic stroke simulates a calligraphic pen by letting you use any object shape as the tip, or nib, used to draw a stroke. For the purposes of this tutorial, you'll use the default tip provided. |
| 5 |
Set the width to 65 and the height to 15 in the Object panel. Remember to press Enter (Windows) or Return (Macintosh) if you type the value rather than using the slider. |
|
The path in the document reflects the changes you applied. Use the arrow keys if you want to adjust the position of the path.
 |
|
Now that you've created a property hierarchy, you'll see what happens when you change that hierarchy. |
| 6 |
With the path still selected in the Document window, drag the calligraphic stroke property above the ragged effect in the Object panel Properties list. The path in the document changes to reflect its reordered properties. |
| 7 |
Select Edit > Undo Move Attribute to revert the path's properties back to their original hierarchy. |
 |
|
In this and previous procedures you discovered the benefits of creating property hierarchies by drawing a path, applying a live effect to it, and then modifying the stroke, which became a subproperty of the effect you applied.
Note: Before continuing, select File > Save.
|