| 1 |
From the Library, drag two instances of Stylized S onto the pasteboard. |
| 2 |
Position them as shown below.
 |
| 3 |
Choose the Rectangle tool and draw a square over the Stylized S instances as shown below.
 |
| 4 |
If the Fill inspector is not already open, choose Window > Inspectors > Fill to open it. In the Fill inspector, choose Basic from the Fill Type pop-up menu and Mahogany from the Fill Color pop-up menu.
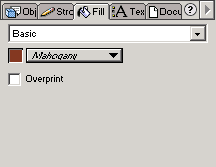 |
| 5 |
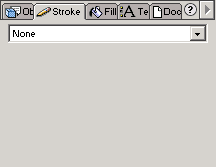
If the Stroke inspector is not already open, choose Window > Inspectors > Stroke to open it. In the Stroke inspector, choose None from the Stroke Type pop-up menu.
 |
| 6 |
Choose Modify > Arrange > Send to Back to move the square behind the Stylized S instances.
 |
| 7 |
With the Pointer tool, Shift-click the square and both instances and choose Edit > Copy. |
| 8 |
Click anywhere on the pasteboard to deselect the square and instances of Stylized S. |
| 9 |
Shift-click both borders. |
| 10 |
In the Fill inspector, choose Tiled from the Fill Type pop-up menu and click Paste In to paste the tile in the preview window and apply it to the selected borders. |
 |
|


