Photography (20GB)
US$9.99/mo
Lightroom on desktop and mobile, Lightroom Classic, and Photoshop on desktop and iPad. Learn more
Learn to adjust image resolution in Adobe Photoshop and explore how image quality is tied to the number of pixels in a file.

It’s a familiar scene: a detective asks someone to “enhance” a blurry image on a computer until it becomes clear enough to make out a key piece of evidence. Does this work? Not the way Hollywood does it.
The only way to resize a smaller photo into a larger, high-resolution image without highlighting poor image quality is to take a new photograph or re-scan your image at a higher resolution. You can increase the resolution of a digital image file, but you will lose image quality by doing so. However, there are some measures you can take in Adobe Photoshop to help you increase resolution while upholding visual quality.
Resampling images in Photoshop means changing their resolutions by adding or subtracting pixels. Resolution is measured in pixels-per-inch or PPI. The more pixels an image starts with, the higher the resolution. Decreasing the number of pixels is called downsampling, which removes data from your image. Increasing the number of pixels is called upsampling, which adds data to the image. When you increase the number of pixels in an image without adjusting the dimensions, you are adding more pixels into the same amount of space and increasing the resolution (or amount of detail) held within each inch. Removing data is preferable to adding it, since Photoshop will have to guess at how any newly added pixels should look.
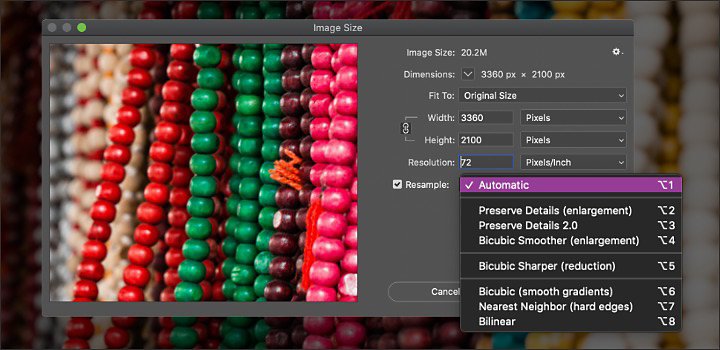
Resampling of any kind, especially upsampling, can result in poorer image quality. The interpolation method is how Photoshop chooses the color values of new pixels. Choosing the correct interpolation method can help avoid unwanted pixelation:

Automatic: Photoshop chooses the resampling method based on the image type.
Preserve Details: An advanced upsampling algorithm with a Noise Reduction slider.
Nearest Neighbor: Best for illustrations with hard edges and no anti-aliasing.
Bilinear: Adds pixels by averaging the color values of surrounding pixels.
Bicubic: Produces smoother tonal gradations than Nearest Neighbor or Bilinear.
Bicubic Smoother: Good for enlarging images. Designed to produce smoother results.
Bicubic Sharper: Good for reducing the size of an image.
When you’re done resampling, applying the Unsharp Mask filter can help enhance image quality.
You may be looking to enhance a lower-resolution photo to print it — a high-resolution TIFF being a better printing format than a low-resolution JPG. If you are open to different image sizes, first try changing the dimensions and resolution of your photo without resampling it. This means working with what you have, not adding new data to the original image. You can always resample as necessary after you’ve tried adjusting dimensions and resolution separately.
See if you can achieve a high-quality print by adjusting only the dimension or resolution without changing pixel count. Photoshop will automatically change the other value for you, keeping the aspect ratio and amount of pixels the same. Follow these steps.

Open your image in Photoshop.

Choose Image › Image Size.

Deselect Resample. This will automatically lock the current ratio of Width and Height.

To adjust Resolution, add new values. Photoshop will automatically change the Document Size to match.

To adjust Document Size, add new values under Height and Width. Photoshop will automatically change the resolution to match.
If you have specific needs for the dimensions or size of your image — like a poster at a certain print size — check the box for Resample. This allows you to adjust the print size and resolution independently, which changes the number of pixels in the image. Get started with these steps.

Open your image in Photoshop.

Choose Image › Image Size.

To maintain the current ratio of Width to Height, be sure the chain icon linking these properties is activated.

Under Dimensions, enter values for Width and Height. The new file size for the image appears at the top of the Image Size dialog box, with the old file size in parentheses.

Select Resample and choose an interpolation method.

If your image has layers with styles applied to them, select Scale Styles under the gear icon to scale the effects. (This option is available only if you selected Constrain Proportions.)

When you finish selecting options, click OK to resample your resized image.
There are ways to make your image look clearer and appear more high-resolution without actually adding pixels or changing the dimensions. Try enhancing the overall look of an image in Photoshop using the Camera Raw filter or sharpening the details in a photo using the sliders in the editing panel in Adobe Photoshop Lightroom.
Try these methods to get the highest quality you can out of the digital information you have in your image.
Find the Creative Cloud plan that’s right for you.
US$9.99/mo
Lightroom on desktop and mobile, Lightroom Classic, and Photoshop on desktop and iPad. Learn more
Photography (20GB)
Lightroom on desktop and mobile, Lightroom Classic, and Photoshop on desktop and iPad. Learn more
US$9.99/mo
US$22.99/mo
Get Photoshop on desktop and iPad as part of Creative Cloud. Learn more
Adobe Photoshop Single App
Get Photoshop on desktop and iPad as part of Creative Cloud. Learn more
US$22.99/mo
US$57.99/mo
Get Photoshop on desktop and iPad, plus the entire collection of creative apps. Learn more
All Apps
Get Photoshop on desktop and iPad, plus the entire collection of creative apps. Learn more
US$57.99/mo
US$19.99/mo.
Save over 60% on the entire collection of Creative Cloud apps. Learn more
Students and teachers
Save over 60% on the entire collection of Creative Cloud apps. Learn more
US$19.99/mo