Adobe Illustrator has everything you need to create an incredible model sheet.
Model sheets & character design.
Consistency is essential to animation. Over 32 years of The Simpsons, Bart has worn the same T-shirt and shorts in practically every episode. In the Frozen franchise, meanwhile, Olaf the snowman carries that distinctive toothy grin across various films, games and merchandise.
Much of this continuity comes from character design sheets. These help animation, filmmaking and game design teams nail key expressions, clothing, poses and personality in every frame and project. That way, the character stays in character, no matter who’s holding the pencil, brush or stylus.
In this guide, we’ll tell you everything you need to know about model sheets — and show you how to create your own.
What is character design?
Character design is the practice of visualising the aesthetic and personality of a character before a single frame of animation even takes place. It’s all about creating a memorable visual persona that will capture the audience’s imagination.
Given that film, animation and video game teams can sometimes be hundreds strong — and production schedules can run for many months, if not years - it’s easy to see how a character’s dastardly smirk or arched eyebrow could get lost in translation.
But that’s precisely where character sheets come into play.
Character design sheets — the basics
Character design sheets — also known as model sheets, character studies or simply ‘studies’ — provide an important reference point for animation and design teams.
Using a model sheet, the original designer can provide exact visual specifications of a character to other animators. These help standardise a character’s key gestures, style and appearance so the team can create a consistent visual.
In a sense, these sheets act a bit like an instruction manual or even a brand style guide. Just as a logo might be derided as ‘off-brand’ if it’s out of proportion or incorrectly coloured, drawings inconsistent with the specs of the character model sheet are called ‘off-models’.
However, it’s important to remember that character design sketches aren’t merely for reference. They’re also used in pitching sessions and with storyboards and animatics. As a result, they can actually have the potential to make or break a production — so it’s important to get them right!
Model sheet types
There are number of key types of sheet that concept artists commonly use when designing characters. You could think of these as individual chapters of your character study.
- Character expression sheets cover facial expressions and emotions. This is key to building a rich personality and temperament, whether your character is jittery, bristly, kindly or cunning.
- Pose sheets specify the key poses of your creation. Motions, gestures and gait are integral to storytelling. In Toy Story, Buzz Lightyear would bomb without his hands-on-hips bravado, while Woody just wouldn’t work without his exaggerated gestures of disbelief.
- Character construction sheets are all about proportions. They regulate the spatial dimensions of your character and give animators a how-to of its basic structure.
- Turnaround model sheets offer a 360-degree character visual. This provides consistent specs from every angle and gives animators the chance to add extra layers of detail to their design — like a rucksack, a trailing dress or spots on the back of the head.
- Colour sheets outline the palette of the character, from clothing to complexion. You might not be thinking Simpsons yellow or Smurfs blue for your creations, but laying down a basic scheme is still essential.
- Write ups. Finally, a quick description can help you to reiterate key elements of your character. Here, you can provide reasoning for your design choices — backing them up with details from your narrative. You can also give specific instructions if needed.
Check out this guide to creating characters with Adobe Fresco in our YouTube tutorials.
How to make character model sheets.
It’s usually best to make your character sheets in sequence. This means that you can use your earlier character sketches as reference points later on.
Read on for our step-by-step guide to the process.
1. Start with construction.
This outlines the basic proportions of your character’s head, body and limbs.
Keep things simple:
- Use basic shapes, like an oval for a head and a rectangle for a torso.
- Design onto a grid for symmetry and proportion. Stick with a front view for now.
- Make sure you’re happy with your proportions and construction before moving to the next stage.
Learn the building blocks of character design in our Illustration masterclass.
2. Move onto a turnaround.
The next stage is to render your character from a range of different angles. Turnarounds are a great opportunity to practise your design and create a rounded, three-dimensional character.
Here are a few tips:
- Include a front, rear, three-quarter and profile view as a minimum.
- Create a combination of full-body views and close-ups on the head.
- Ensure that your proportions line up exactly in every angle. So, if your character’s eyes hit a certain grid line from the front, make sure they do so from the side.
- Use the front and profile views as reference points for your three-quarter view.
- Refer to your front-on drawing to line up your rear view.
Remember — you can also use your construction drawings as a guide here. Establish it as the base for your turnarounds, adding extra layers on top to adjust your character’s position.
3. Capture their expressions.
OK. You’ve sketched the proportions and rough 360 visuals for your character. Now it’s time to inject some personality!
- On a basic level, your expression sheet should cover a key set of facial emotions and reactions. Think joy, sadness, anger or surprise.
- It’s always a good idea to think about your character arc here. What emotions will they experience throughout the story?
- The more detail you include in your expression sheet, the better. Don’t forget to show off the temperament of your character — a snarky sidelong glance can be more effective than a simple smile or frown.
- Use your earlier construction and turnaround images as a starting point. From there, layer up expression and interest in the eyes, eyebrows and mouth.
4. Map out the key poses.
Animation allows storytellers to create extraordinary characters and plotlines. But bringing realism to a character’s movements and poses is key for audience buy-in.
- Consider characterisation. Before you start sketching, think about the personality of your character. Are they a physical, agile character who leaps, ducks and dives or are they more sedate and retiring? Use this as the starting point to create 4-5 key poses.
- Study anatomy. Similarly, for exaggerated, dynamic poses (think superheroes and fairy-tale protagonists), take a look at photos of athletes mid-jump or sprint. These can be important to capturing realism in your poses - no matter how extraordinary they are.
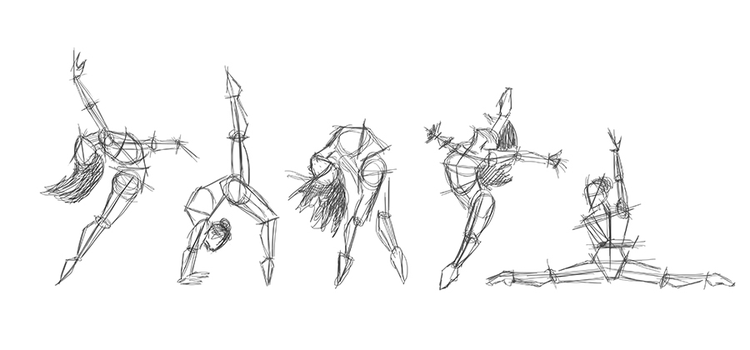
- Create action lines. For angular poses, draw an action line to map out the shape. These provide a framework for your pose and should follow the rough direction of the spine and legs. You can use this as a starting point for more elaborate poses.
For 3D and 2D computer animators, key poses have practical significance too. They’re used to help rig characters and bring them to life.
Learn more about character sketches in this masterclass:
5. Add a splash of colour.
Finally, specify the exact colours and shades you want to include in your character design.
Think about elements like skin tone and outfits, as well as specific colourings for certain expressions and poses. You might choose red to signify anger or embarrassment. Or perhaps your villain has a ghostly white or sickly green pallor.
Choose wisely here — as different colours have different meanings. Make sure you choose shades to match your character’s personality.
From construction sketches to awe-inspiring poses
Adobe Illustrator has everything you need to create an incredible model sheet.
Characters on top of the world.
Racing to victory.
Three-headed dragon.
Collection of dancers.
Discover creative inspiration with Behance.
If you want to find even more great examples of character art and model sheets, visit Behance - the world’s largest network for showcasing creative work.
Character design sheet templates.
Character design templates can be a useful tool to help you to get started with your model sheet. Here are a few handy examples:
- Turnaround model sheet for Adobe Illustrator.
- Colour, expression and construction profile template on Pinterest
- An 8 heads character turnaround template from DeviantArt
Researching around the web further will help you to find further inspiration and useful tools.
Model sheets: FAQs.
What is a rough model sheet?
A rough model sheet is like a construction sheet, showing the underlying shape and structure of a character. These provide a simple framework for animators to follow when creating a design or movement. Rough model sheets demonstrate underlying structure, but can also generate fully-costumed poses too.
What size are character sheets?
Character design sheets vary depending on the media involved. On paper, some artists recommend an 8.5 inch by 11 inch-sheet for each drawing, which is approximately 21.5 cm by 28 cm. Online, your canvas size will depend on your screen and platforms. For display, a good canvas size is 2000 x 1200 pixels. This will display well on a range of devices.
How can I improve my character design?
The key to improving your character design is by including detail. Draw from different angles, try out different poses and create as rich a portrait as you can. Remember to think about your character’s emotions, psychology and story arc when you’re designing their aesthetics.
Learn more in our guide to character concept art.