- Search on Adobe Stock
- Import your template
- Place the template on your sequence
- Customize the template
- Duplicate the template
- Find the perfect music track
- Search for Adobe Stock audio
- Add a Track to Your Timeline
- Play the video
- Export
Add instructional effects to enhance videos with Adobe Stock Motion Graphics templates
Add detailed arrows and lines to enhance your tutorial videos with Adobe Stock Motion Graphics templates.
Search for a Motion Graphics template on Adobe Stock.
On stock.adobe.com, set the search bar filter to “Templates” and search for the term “arrow pack”
License the selection, which will automatically download it to your computer.
Note: You can also search and license directly inside Adobe Premiere Pro within the Essential Graphics panel Browse tab.

In the menu bar, click Window > Workspaces > Graphics
Locate your Essential Graphics panel
Click the Browse tab
In the lower right corner of the panel, click the Plus button to import your downloaded Motion Graphics template.
Navigate to its location on your hard drive and select it.

In your Essential Graphics panel, click the Browse tab. Scroll to (or search for) your newly imported Motion Graphics template.
Drag and drop the template onto your timeline.

Use the Essential Graphics panel’s Edit tab to customize the look and feel of your new Motion Graphics template.
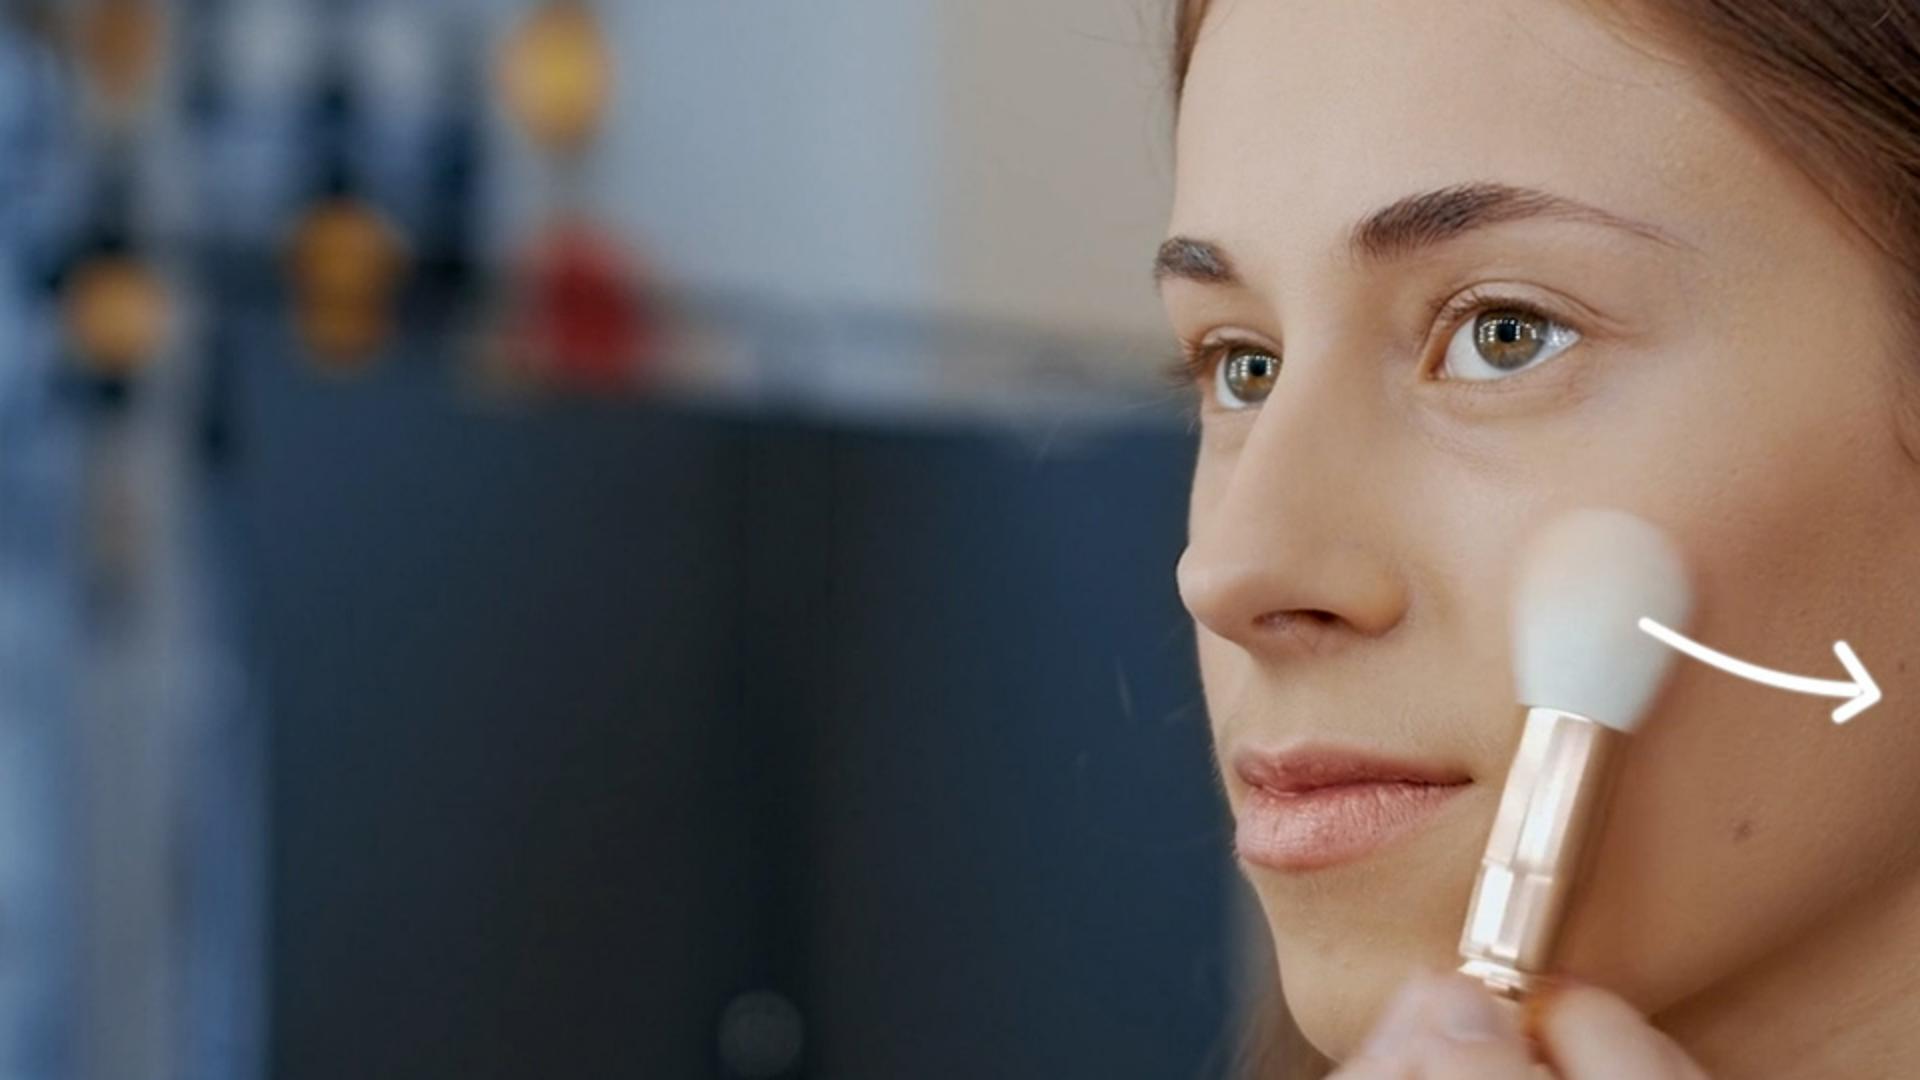
In our example, we’re highlighting various makeup brush techniques our influencer is using for their social video.
We’ve made the following adjustments:
Arrow Style: 2
Global Position: X 1311.0 Y 336.0
Global Size: X 13 Y 13
Arrow Glow on/off: checked
Arrow Rotation: 164.0
Arrow Width: 58
Arrow Taper: 11
Arrow Length: 34
We left the Arrow Color 01 and the Arrow Head Color the same shade of white.

Now we’ll duplicate your template in the timeline to add more technique highlights.
Copy and paste your existing template on the timeline and use the Edit tab in the Essential Graphics panel to customize the look and feel of the template a second time. In this case, we’re showing the motion of the makeup brush on the model’s cheek. We made the following adjustments to the Motion Graphics template.
Arrow Style: 12
Global Position: X 1344.0 Y 608.0
Global Size: X 29 Y 29
Arrow Glow on/off: checked
Horizontal Flip: checked
Arrow Rotation: 102.0
Arrow Width: 22
Arrow Taper: 14
Arrow Length: 51
We left the Arrow Color 01 and the Arrow Head Color the same shade of white.

In Adobe Premiere Pro, select the Audio Workspace preset, or choose Workspace > Essential Sound to reveal the all new Essential Sound panel with Adobe Stock audio built right in. Make sure you click Browse at the top of the panel so you can explore the extensive library.
You’ll notice that the Browse tab in the Essential Sound panel has a search bar, as well as three options to help limit your results: Mood, Genre, and Filters.

Use the search bar to search for keywords. You can also limit your results by Mood, Genre, Tempo, Vocals, etc.

Once you find a track that you want to cut into your timeline, simply drag and drop it from the Essential Sound panel, directly into your timeline.
Note that this temp version of the Adobe Stock audio track is an m4a with no audio watermarks to interrupt the experience of your edit. You can export these versions, watermark free, to share privately with clients and collaborators.
When you license a track for inclusion in your final edit, Adobe Premiere Pro will seamlessly replace the m4a version with a high quality wav file.

Tap the spacebar to play your video through. Check for pacing and for any necessary copy edits.

Export your video with an Adobe Premiere Pro preset for social media or desktop presentations.
We’re using a 1080p HD YouTube preset that outputs a video we can use anywhere on the web.

You’ve added instructional effects to enhance your video with Adobe Stock Motion Graphics templates.


