|
| 2 |
Specify the database table into which the record should be inserted by completing the Connection and Insert Into Table pop-up menus. |
|
If your site does not have a connection to the database yet, click Define to create one. |
| 3 |
In the After Inserting, Go To text box, enter the page to open after the record is inserted into the table. This is usually a page informing your user that the new record has successfully been added to the database. |
|
Next, you'll create an HTML form for data entry by completing the bottom half of the dialog box. |
| 4 |
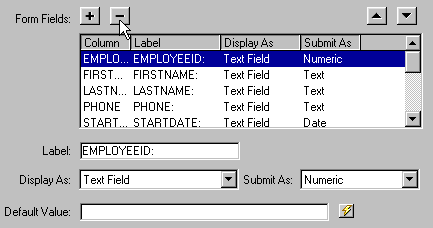
In the Form Fields area, specify the form objects you want to include on the insert page's HTML form, and which columns in your database table each form object should update. |
|
By default, UltraDev creates a form object for each column in the database table. To eliminate unwanted columns from your insert page, select a database table column and click the minus (-) button.

|
|
If your database automatically generates unique key IDs for each new record created, remove the form object corresponding to the ID column by selecting it in the list and clicking the minus (-) button. This eliminates the risk that the user of the form will enter an ID value that already exists. |
|
You can also change the order of the form objects on the HTML form by selecting a form object in the list and clicking the Up or Down arrow on the right side of the dialog box. |
| 5 |
Specify how each data-entry field should be displayed on the HTML form by clicking a row in the Form Fields table and entering the following information in the boxes below the table: |
 |
In the Label box, enter a descriptive label to display beside the data-entry field. By default, UltraDev displays the table column's name in the label. |
 |
In the Display As pop-up menu, choose a form object to serve as the data-entry field. You can choose Text Field, Text Area, Menu, Checkbox, Radio Group, and Text. For read-only entries, choose Text. |
 |
In the Submit As pop-up menu, choose the data format expected by your database table. For example, if the table column only accepts numeric data, choose Numeric. |
 |
Set the form object's properties. You have different options depending on the form object you choose as your data-entry field. For text fields, text areas, and text, you can enter an initial text value. (For example, if you want "Enter Last Name Here" to appear in the selected text field, enter that text in the Default Value text box.) For menus and radio groups, you open another dialog box to set the properties. For checkboxes, select the Checked or Unchecked option. |
| 6 |
Click OK. |
 |
|
UltraDev adds both an HTML form and an Insert Record server behavior to your page. The form objects are laid out in a basic table, which you can freely customize using the Dreamweaver page design tools. (Make sure all the form objects remain within the form's boundaries.)
To edit the server behavior, open the Server Behaviors panel (Window > Server Behaviors) and double-click the Insert Record behavior.
You must enter information into every form object on the insert record page in order to add a new record to your database. If there are blank form objects on the page (for example, if the user forgets to type in an employee's first name in a "First Name" text field), the application will not work.
|