|
Using the Flash Export Xtra
The Flash Export Xtra exports a FreeHand document as an animated movie in the Macromedia Flash SWF format.
To use the Flash Export Xtra:
| 1 |
Choose File > Export and choose Macromedia Flash (SWF). |
| 2 |
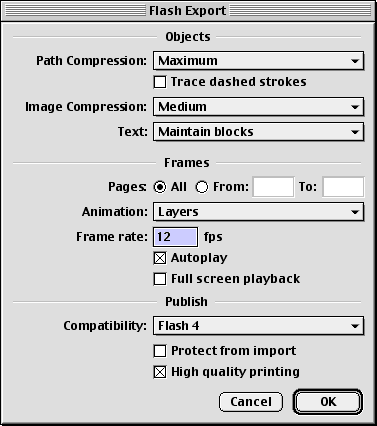
Click Options to display the Flash Export dialog box, and set the following options:
 |
 |
Choose one of seven path compression settings to control the precision with which FreeHand converts paths to Flash paths. Options range from None to Maximum. Increased precision translates to less compressed, more accurate, larger files. |
 |
Select Trace Dashed Strokes to give FreeHand's dashed strokes the same appearance as Flash's dashed strokes on conversion to Flash. This process converts a dashed stroke to a separate Flash object and may increase file size. |
 |
Choose from seven settings for Image Compression. Upon export to Flash, bitmap images convert to JPEG images. JPEGs can be compressed using one of seven compression levels, from None (no compression, highest quality, largest file size) to Maximum (most compression, lowest quality, smallest file size). |
 |
Use the Text option to control whether text is retained as text blocks editable in Flash or converted to paths, which are not editable in Flash. Retaining text as text blocks requires that the fonts used to create the text be available when the document is opened in Flash. Converting text to paths maintains proper text appearance even if the font is unavailable, but converted text is no longer editable in Flash. In addition, converting text to paths increases file size. |
 |
Use the Pages option to specify a range of pages to export. |
 |
Use the Animation options (Layers and Pages, Layers, Pages, and None) to control the behavior of layer-based and page-based animations. Choose Layers and Pages to produce a single SWF file with all layers of the first page comprising separate frames, followed by all layers of the second page, and so on. Choose Layers to export each FreeHand layer as a Flash frame and each page as a separate SWF file. The layers of each page are included in the file for that page. Choose Pages to export each FreeHand page as a Flash frame. This produces one SWF file, with the layers of each page making up the image for that Flash frame. Choose None to export each page of your FreeHand illustration as a separate SWF file. |
 |
Use the Frame rate option to specify the frame rate of the Flash movie in frames per second (fps). For smooth animations, choose 12 fps. |
 |
Select the Autoplay option to cause the animation to automatically begin playing when opened in the stand-alone Flash Player. |
 |
Use the Full Screen Playback option to make your animation play full-screen until the user presses the Esc key. This option has no effect on Flash movies played in a Web browser. |
 |
Use the Compatibility option to choose the Flash version to which to export the file. |
 |
Select the Protect from Import option to prevent the exported FreeHand document from being imported into Flash. Select this option only if you do not intend to edit the animation in Flash. |
 |
Select High Quality Printing to support high-resolution printing from Flash 4 or later. When this option is selected, choosing Print from the context menu sends high-resolution vector data to the printer. If this option is not selected, the Print option in the context menu is dimmed and the file can be printed only by using the browser's Print command; the file will print at screen resolution. For more information see Using Flash or Flash Help. |
 |
|
Exporting: A brief tutorial
This section guides you through a simple animation and export process using FreeHand's Flash Export Xtra.
| 1 |
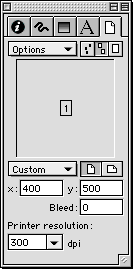
Open a new FreeHand document and use the Document Inspector to set the page size to 500 x 400 pixels.
|
| 2 |
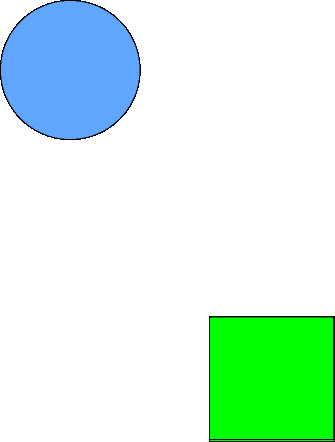
Create a circle in the upper left corner of the page and a square in the lower right corner of the page. |
| 3 |
Create an RGB color in the Color Mixer, then drag and drop it to fill the circle. Do the same for the square, with a different color.
|
| 4 |
Choose Modify > Ungroup to ungroup the two objects. |
| 5 |
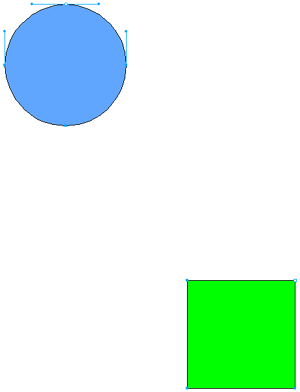
Press Alt+Shift (Windows) or Option+Shift (Macintosh) and select one point on the circle and one point on the square. |
|
The selected points should be hollow, as shown.
|
| 6 |
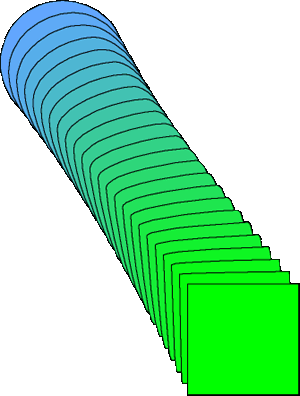
Choose Modify > Combine > Blend to blend the objects.
|
| 7 |
With the blended objects still selected, open the Object Inspector and set the number of steps to 10. |
|
A higher number of steps slows document redraw. You can use Find and Replace Graphics to set the number of blend steps low while designing an illustration and then, as a final step in the design process, search for blends having a low number of steps and replace them with blends having a greater number of steps. |
| 8 |
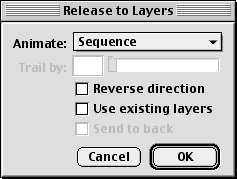
Choose Xtras > Animate > Release to Layers to open the Release to Layers dialog box. Set Animate to Sequence and leave all other settings as shown.
|
|
When you choose Sequence, FreeHand releases all objects to separate layers. |
| 9 |
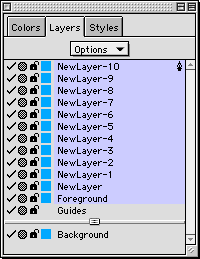
Click OK to close the Release to Layers dialog box. Extra layers are added to the Layers panel.
|
| 10 |
Choose File > Export to open the Export dialog box, then choose Macromedia Flash (SWF) as the file type to be exported. |
| 11 |
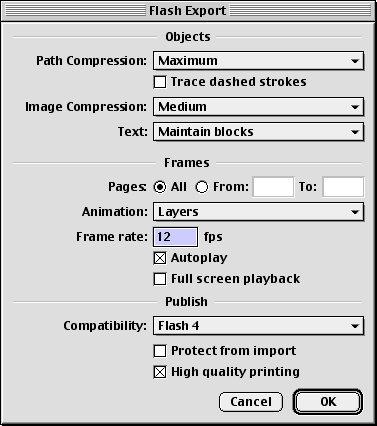
Click Options to open the Flash Export dialog box, then choose the settings shown here.
|
|
When you choose Layers as the Animation type, each layer in your FreeHand document exports as a separate frame in the Flash SWF file. |
| 12 |
Close the Flash Export dialog box and export the SWF with an appropriate name. |
| 13 |
From within Flash, choose File > Import to import the SWF file that you just exported from FreeHand. |
 |
|
You've just created an animation in FreeHand and exported it into Flash using the Flash Export Xtra. The many options associated with this process give you the flexibility to work with a wide variety of design types and intended uses.
|