|
Work with styles
In this section, you'll learn to use styles. When multiple objects in a document share similar attributes, styles can simplify formatting changes and help you to maintain consistency.
Different types of styles exist for the different types of objects in FreeHand. Graphic styles allow you to define attributes specific to graphic objects, and text styles allow you to define attributes specific to text. Connector styles are a special type of graphic style that allow you to define the attributes for connector lines.
In the following procedures, you'll work with text styles.
Define a new style
With styles, you can define a set of attributes and then easily apply them to multiple objects. Here, you'll define a text style that you'll apply in the next section.
| 1 |
Click on the pasteboard to deselect all text and objects in the document. |
| 2 |
If the Styles panel isn't already displayed, select Window > Styles. |
| 3 |
Click the Styles panel Options menu control to display the Options menu, and select Large List View so you can see the names of styles in addition to their previews.
 |
| 4 |
Select the Normal Text style. |
| 5 |
In the Object panel Properties list, select the Text property (the second item in the list) to display text attributes.
 |
| 6 |
Set the font name to Times or Times New Roman (whichever is available on your system), and set the type size to 18. Remember to press Enter (Windows) or Return (Macintosh) if you type the value rather than using the pop-up menu. |
| 7 |
In the Styles panel, click the Options menu control and select New from the Options menu. |
|
This creates a new text style using the attributes you defined. |
| 8 |
Double-click the style name for the new style you created and type Brochure Text, then press Enter (Windows) or Return (Macintosh). |
|
The style preview beside the style name in the Styles panel reflects the appearance of the new text style. |
 |
|
Apply a style
Here you'll use the style you defined in the previous procedure to set the attributes for several text blocks simultaneously.
| 1 |
Shift-click all the text blocks and text-in-a-path objects in the document except the logo text and the page title. |
| 2 |
Click the Brochure Text style in the Styles panel. |
|
The attributes of all selected text blocks change to reflect the new style. |
 |
|
Redefine a style
You can modify existing styles by redefining them. This allows you to make an attribute change once and have it reflected in all objects that use that style.
Here you'll make a simple change to the Brochure Text style to quickly modify the attributes of all text objects that possess that style.
| 1 |
Click on the pasteboard to deselect all objects. |
|
Properties for the Brochure Text style are still displayed in the Object panel. |
| 2 |
Select the Text property (the second item in the Object panel Properties list). |
| 3 |
Set the font name to Arial. |
| 4 |
Select the Brochure Text item at the top of the Object panel Properties list. |
|
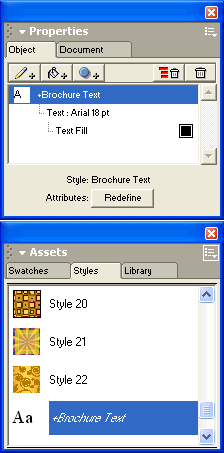
Both this item and the Brochure Text style in the Styles panel have a plus (+) sign beside them, indicating that attributes of the style have been modified.
 |
|
The style is only temporarily modified, however. When a style has a plus sign beside it, its modifications will apply only to new objects you create. Attributes for existing objects with this style won't be altered unless you click the Redefine button. |
| 5 |
Click the Redefine button in the Object panel. |
|
Clicking Redefine causes all text blocks in the document that possess the Brochure Text style to change to reflect the style modification. In the Styles panel and the Object panel Properties list, the style name also no longer has a plus sign beside it. |
 |
|
Create styles based on selections
Previously, you created a style by defining properties when no objects were selected in the document. Next you'll create two new styles based on the properties of selected text.
| 1 |
Select the bulleted text block.
 |
| 2 |
In the Object panel, select Italic as the font style. |
| 3 |
Ensure that the plus (+) sign is selected in the Leading pop-up menu, and set the leading to 15; then press Enter (Windows) or Return (Macintosh).
 |
|
The leading, or the distance between lines, for the text block is increased by 15 points. Don't worry if you now have overflow text in the text block (indicated by the dot in the link box). You'll change the size of the text block later. |
| 4 |
Double-click inside the selected text block, and highlight the first line of text. Before highlighting, the text may be difficult to see because it is the same color as the object on which it is placed.
 |
| 5 |
In the Object panel, select Bold as the font style. |
| 6 |
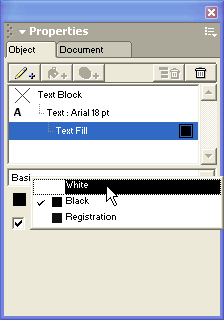
Select the Text Fill property in the Object panel Properties list, and select White from the swatches pop-up menu in the Object panel.
 |
|
In previous procedures you applied styles to entire text blocks. You can also apply styles to individual paragraphs within a text block, as you'll do here. |
| 7 |
In the Styles panel, display the Options menu and select New to create a new style based on the selected paragraph. The new style appears at the bottom of the list. |
|
Note: Although you created a new style, the previous style will still be highlighted because the selected text block as a whole still possesses that style. |
| 8 |
Double-click the new style at the bottom of the Styles panel and type New Features Heading, then press Enter (Windows) or Return (Macintosh). |
| 9 |
Click outside the text block to deselect the selected paragraph, then click the block again to select the entire block. |
| 10 |
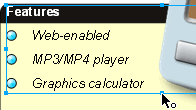
Double-click the bottom center handle on the text block.
 |
|
The bottom center handle becomes hollow, and the text block's height adjusts to fit its contents. Double-clicking a text block's bottom center handle changes it from a fixed-height text block to an auto-expanding text block, or vice versa. Auto-expanding text blocks automatically resize to fit their contents. You can convert fixed-width text blocks to auto-expanding text blocks in a similar manner by double-clicking one of their side-center handles. |
| 11 |
Double-click in the text block to display an insertion point, then highlight all four bulleted lines of text. Be sure to include the bullets. |
|
Above the text block, the text ruler is displayed. Using this ruler, you can adjust a variety of text settings, including tabs. |
|
Note: If you don't see the text ruler, select View > Text Rulers. |
| 12 |
Drag the left-align tab icon down onto the text ruler as shown below. As you drag, a preview indicates where the tab will be placed if you release the mouse button. Release the mouse button when the pointer is near the location shown here.

 |
|
Tip: For the purposes of this tutorial, the tab position doesn't have to be precise. If desired, however, you can double-click the text ruler to display the Edit Tab dialog box and set the tab position at precisely 25 points. |
|
The text in the document changes to reflect the new tab setting. |
| 13 |
With the bulleted text still selected, select New from the Styles panel Options menu. The new style appears at the bottom of the list. |
| 14 |
In the Styles panel, name the new style Bulleted Text. The new style is automatically applied to the selected text. |
 |
|
Override a style
Earlier in the tutorial, you modified a style and then redefined it to alter all objects with that style in the document.
Sometimes, however, you may need to modify an object's style without changing all other objects that use that style. In such cases, you can conduct a style override.
| 1 |
Double-click the text beside the Golden Gate Bridge photo at the bottom of the page to display an insertion point. |
| 2 |
Highlight the Win a trip to San Francisco! text. |
| 3 |
In the Object panel, select Bold as the font style and set the type size to 24. Remember to press Enter (Windows) or Return (Macintosh) if you type the value rather than using the pop-up menu. |
|
In the Styles panel, the Brochure Text item has a plus (+) sign beside it, indicating that it has been changed. However, it isn't permanently changed unless you redefine the style as you did previously. In this case, you won't redefine the style, because many other text blocks use the style, and you don't want to alter them. |
| 4 |
Click in the lower portion of the text block to deselect the previous text and move the insertion point. |
|
In the Styles panel, the Brochure Text item no longer has a plus sign beside it. This means the changes you made in the previous step did not change the style for the rest of the text in the text block. Nor did it permanently alter the style in the Styles panel. By changing the selected text's attributes without redefining the style, you applied a style override. |
| 5 |
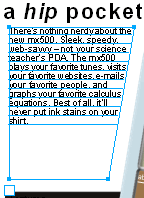
Select the large text-in-a-path object beneath the page title.
 |
| 6 |
In the Object panel, ensure that the Text property is selected in the Properties list, and in the bottom portion of the panel, increase the text block's leading by 10 points.
 |
| 7 |
Double-click anywhere in the text block. |
|
In the Styles panel, the Brochure Text item again has a plus sign beside it. This time, instead of overriding the style for a selected paragraph within a text block, you overrode the style for the entire text block. |
| 8 |
Click on the pasteboard so no objects are selected. |
|
The Brochure Text style in the Styles panel again no longer has a plus sign beside it, indicating that the changes you made to both text blocks in this procedure did not permanently alter the style. You overrode the style twice without permanently altering it or affecting other text blocks that possess that style. |
 |
|
In the previous procedures you discovered the value of using styles. Although you worked with text styles, these same concepts apply to graphics as well: you can define, apply, redefine, and override graphic styles in the same way.
Note: This is a good time to save your document.
|