VIDEO
Add jump cuts to your video production.
Try the editing technique featured in everything from groundbreaking films to YouTuber vlogs. It’s easy with Adobe Premiere Pro.

What is a jump cut in a film?
A jump cut in filmmaking is an edit to a single, sequential shot that makes the action appear to leap forward in time. To fit the textbook definition of a jump cut, it must break a continuous shot into two parts. This causes the subject in the video to abruptly “jump” to a different position — hence the name.
After the cut, the subject may appear in a different position or attitude or the camera position may be slightly different. This cut style is a significant departure from the standard conventions of continuity editing, which dictates that the camera angle should change by at least 30 degrees from one clip to the next. The jump cut ignores this rule.
What is a jump cut in a screenplay?
Say you’re not just editing and directing a film, but you’re writing the screenplay, too. The scene transitions that you envision are an essential part of the storytelling. A jump cut in a screenplay is like any other editing direction you’d write into your script.
While there’s some debate over the best way to write jump cuts into screenplays, the point is to clearly communicate your vision to everyone reading the script. There are two simple ways you can do this:
- Use the editing direction “JUMP CUT TO” according to screenplay formatting best practices. You’ll add in the jump cut direction for every separate scene you want to portray.
- While not as specific as JUMP CUT TO, you can also use SERIES OF SHOTS. This is exactly what it sounds like — a series of shots indicates multiple, often quick-cut shots of a scene. Depending on your preference, you can use your series of shots as jump cuts or even a montage. Indicate each new shot in a list format using a double dash (--) in your screenplay.
- Just remember that for a true jump cut, your camera angle can’t move by more than 30 degrees, if it moves at all.
A brief history of the jump cut.
In the early 1900s, filmmaker Georges Méliès discovered the jump cut and used it to portray magic tricks. With cuts that appeared seamless, Méliès made characters magically disappear and reappear.
Jump to 1959 and Jean-Luc Godard’s Breathless. Godard broke the rules with obvious jump cuts in the same sequence. During a driving scene, the camera angle remains the same, over the shoulder of the character Patricia in the passenger seat, but the scenery in the background changes abruptly.
The effect of the discontinuity is to disorient the viewer and draw attention to the artificial nature of film. Some claim that the producer forced Godard to make drastic cuts to the film, so he cut it haphazardly out of spite, accidentally creating one of the most influential films of the French New Wave.
Since Godard, filmmakers have used jump cuts in countless creative ways. These cuts can work with dramatic or comedic effect to show the passage of time as a character changes positions in a single shot. They can use a single camera position to show a character covering a great distance without making the audience watch every step. Jump cuts can also portray the point of view of a disoriented or confused character without resorting to special effects.


When to use jump cuts.
Today, if you want to see the very definition of a jump cut in action, look no further than YouTube. On that specific platform, it’s common for makers of talking head videos to use jump cuts to skip awkward pauses or mistakes. Modern audiences are used to the technique, so you can make edits in post-production instead of trying to get one perfect take.
“People have little conversational fillers or they’ll pause to think for a second and no one wants to watch that, so you can cut those parts out and speed up the video,” says videographer Nick Cann.
But jump cuts aren’t just for YouTube. In marketing videos, jump cuts can add energy to the message. “A jump cut can fast-forward the vibe of a video and get the viewer’s heart rate up so they get excited and get a bit more involved. There’s no wasted time, no quiet points,” Cann says.
Jump cuts can be a great tool for showing the passage of time, with people abruptly coming and going while the camera stays still. They can also enhance mood, whether for comedy or horror, by having things suddenly appear or disappear on screen.
If you’re looking to surprise your viewers, take a lesson from Van Halen — you might as well jump. Just don’t overdo it. Footage that is too choppy becomes jarring and hard to watch. Like the match cut and the smash cut, the jump cut is a cinematic tool you should use only when there’s a good reason for it.

https://main--cc--adobecom.hlx.page/cc-shared/fragments/seo-articles/premiere-pro-create-card
How to jump cut in Adobe Premiere Pro.
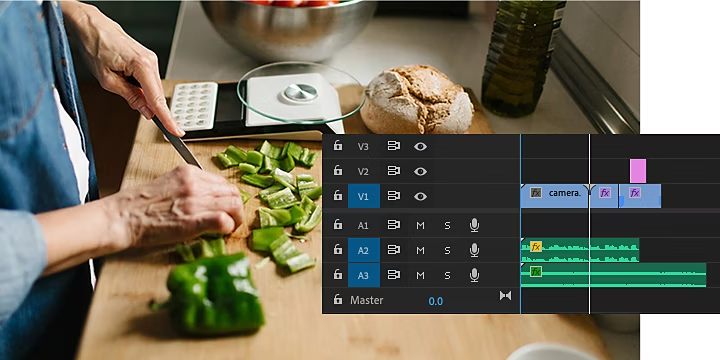
One way to make cuts is by clicking Command + K on a Mac or Control + K on a PC, which splits the clip at the frame your playhead is on. This is easy to use when you find a section you want to cut while scrubbing through your footage. To cut the audio tracks along with the video footage, click Shift + Command/Control + K.
To make cuts with the Razor tool, follow these steps.
1. Drop the video footage in your timeline.
2. Make sure you have the Snap setting on and your audio locked so that your clips can snap into place next to each other and your audio stays synced after you make a cut.
3. Click the Razor tool (or press C) and click the spot in your clip where you want to begin your cut.
4. Click the tool again and make a cut where you want to restart the action.
5. To select and delete segments with ease, use Alt/Option (depending on your operating system) + Delete to ripple close the space between clips as you make cuts.
6. To refine your cuts even further, zoom in on the timeline (tap the + key) and repeat your Razor work.

How to avoid a jump cut.
Filmmakers have developed many ways to edit out mistakes or awkward pauses without resorting to jump cuts. You can cut away to another scene and perhaps crosscut the two scenes or you can cut to B-roll. For example, if you were filming a New York City story with two characters sitting and chatting on a bench in Central Park, you could cut to footage of a park scene during any lulls. Then, you can cut back to the conversation when the conversation picks back up.
Build your editing skills.
Learn how to trim clips with precision in your Premiere Pro timeline. Whatever video editing software you use, you can find practical step-by-step tutorials to get the final cut you want.
