A beginner's guide to food photography.
Try your hand at food photography with these insightful tips from experienced photographers.

Picture this: You’re eating out at a beautiful restaurant. The atmosphere, lighting and decor are all lovely. Then your stunning dinner arrives. This seems like a perfect time to snap a photo of your plate. But food photographs taken in this low-light setting never look as good as they should. The delectable truffle spaghetti and succulent pheasant come out looking flat, bland and unappetising. What happened?
Great food photography takes careful planning and more than just a point-and-shoot camera. Consider these insights and tips from professional photographers when beginning your journey into the realm of culinary photography.
The reality of food photography.
First, it’s important to understand a little bit about the food photography industry. Experienced photographer and teacher Ben Long explains, “If you’re looking at professional food photography in a food magazine or in a really upscale cookbook, that’s great to aspire to, but don’t be disappointed when your shots don’t look like that — because you’ve got to remember that in a situation like that, they’ve got a professional food stylist who has come in to basically do hair and makeup on the food. They have a tremendous bag of tricks for styling food, all of which make the food toxic and inedible.”
“So if you’re actually just trying to set some food out and shoot it, you’re inherently at a disadvantage compared with someone who’s a professional food stylist. But that doesn’t mean you shouldn’t continue to try. Just set achievable, realistic goals for yourself. Otherwise, you’ll be pounding your head against the wall.”


Long continues, “There’s very little on a professional food photography set that you can actually eat. It’s very rare that any ice cube you see in professional food photography is real. Water splashed on lettuce — that’s not real. There are just so many tricks food photographers use. So if you’re actually just trying to set some food out and shoot it, you’re inherently at a disadvantage compared with someone who’s a professional food stylist. But that doesn’t mean you shouldn’t continue to try. Just set achievable, realistic goals for yourself. Otherwise, you’ll be pounding your head against the wall.”
“There’s very little on a professional food photography set that you can actually eat.”

Starting from scratch.
Now, with that in mind, appetizing food photography can be done without making your subject toxic. If you’re looking to gain some experience, start with the basics. Food photographer Sarah Aagesen says, “I typically always try to have a plan. I’ll have a style in mind that I want to do before I start.” So before you start, be sure you have the materials, props and gear you need.
“I typically always try to have a plan. I’ll have a style in mind that I want to do before I start.”
Timeliness is also an issue to consider. If your subject is frozen, like an ice lolly or iced beverage, it can visually change quite quickly. To address this challenge, make sure you do research on your food product and get more than one example of it. Not every piece of fruit or cold treat looks good enough to eat, so having options is essential. Also consider whether your subject is served hot or cold. Hot steam can negatively affect your lighting and shadows, so consider letting a hot subject cool before starting your shoot — plan ahead and think about what will make your food look appetizing.

Choose your location.
Once you know what your subject will be, it’s time to choose a location to shoot. Your food item should influence and affect this location decision. Long says, “The texture that you’re shooting on might be important. If you’re shooting a Mediterranean salad, you maybe don’t want a lot of rustic Americana props around. You want stone or tile or something like that underneath the salad bowl.”
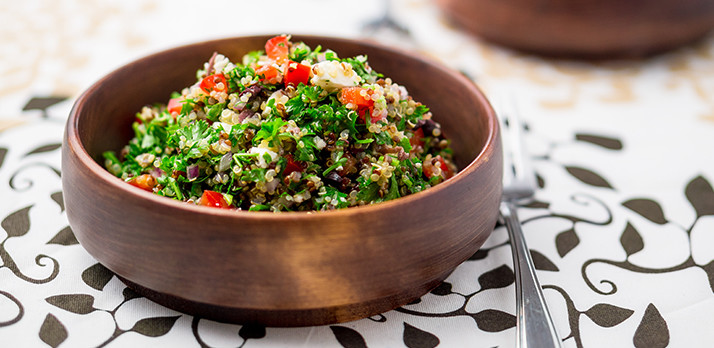
“The texture that you’re shooting on might be important. If you’re shooting a Mediterranean salad, you maybe don’t want a lot of rustic Americana props around. You want stone or tile or something like that underneath the salad bowl.”
Where would this food normally be eaten? If you’re photographing a beefburger, you probably won’t put it on a fine, white linen table cloth, unless that disparity and contrast is a stylistic and artistic choice. The decision about location and setting will also affect your lighting choices and options.
Lighting your food photograph.
Aagesen cautions against direct sunlight for your food photos. But that’s not to say natural light isn’t ideal. She advises, “Consider shooting through a window, if it’s not direct sunlight or through a white curtain that diffuses the light.” Overcast and cloudy days can be ideal for photographing food — photographing food outside may seem counterintuitive, but Aagesen says that sometimes that’s where you’ll find the best light.
If overcast natural light isn’t available, have no fear. Having several softbox lights on hand can do the trick. Try bouncing the light off the ceiling or set up your artificial lighting on opposite sides of your subject. This can balance out the lighting and eliminate most shadows. Don’t try shooting photos with just your overhead, household lights. This can skew your white balance. Household lights can add unwanted orange or yellow tinges to your food, making it look unappetising.


Styling your food photograph.
With food photography, you need to style the food and the shot. With food styling, aim for a natural look. Don’t worry about making it picture perfect; focus on making it look appetizing. For instance, say you’re shooting a smoothie bowl. Aagesen explains, “I’ll start with something that’s pretty unstyled, with maybe just the smoothie in the bowl to start. And I'll take photos along the process as I’m adding things. So I’ll have them through different steps, in case I end up going too far or adding too much. Sometimes you’ll add a few things and think, ‘You know, it looked better a few less ingredients ago.’”
Photographing and documenting your food as you style can help to ensure you get the shot you need. This also lets you look at your progress and identify what needs to be changed or shifted in your food composition.
Aagesen uses a similar system for styling her food photos. “Typically when I’m starting out,” she says, “I will take one or two shots with things really simple, with just the dish in there, with a clean background. So then I have that as an option and then I'll start adding in props.”


When it comes to styling the shot, props are important. Using ingredients from the recipe you’re featuring can be a good choice for food photographs. Use a variety of utensils, serviettes and hand towels as well. They can add interesting texture and colour to your image. You can add some variety to your images by experimenting with adding flowers or fresh greenery to your shot. While this aesthetic is less realistic, it’s up to you to develop your individual style and can provide nice contrast to your other images.
Shooting your food photographs.
Be smart about shutter speed and depth of field when photographing food. Focus is hugely important: for instance, if there’s text on a label you’re capturing, you need to be careful that your shutter speed on your DSLR camera isn’t too slow. Any slight movement could blur the packaging text and ruin the shot. Aagesen typically shoots with a lower aperture — between 2.5 and 4.6 — but she sometimes bumps that up for overhead shots. A deep or shallow depth of field can be important for drawing attention to your area of focus. And blurring out the background can be effective for eliminating distracting details. But don’t go too narrow or the whole dish may not stay in focus.

Consider your composition and try using the rule of thirds as well. Photographer Samuel Nute says, “Think of your viewfinder as broken up into nine different sections and try and stay cognizant of what’s filling up six of those areas.” Keep the most important compositional elements, aka the food, placed along those lines or at the intersection points that make up the rule-of-thirds grid. Food photography is similar to still life photography and using the rule of thirds can “make all of your photos instantly look better,” according to photographer Derek Boyd. Keeping composition tools like this in mind can quickly make your food photography shoot more successful. If you don’t nail the composition while shooting, don’t forget about photo editing in post-production. You can always crop in and edit colours later to perfect the shot.

Try using both a tripod or shooting handheld. This will give you a variety of photographs to choose from. And sometimes when you’re moving your camera around, you may unexpectedly find a better composition for your photo. Moving around gives you an opportunity to test camera angles and experiment with composition, while a tripod lets you perfect one specific food shot, like a close-up.
“Think of your viewfinder as broken up into nine different sections and try and stay cognizant of what’s filling up six of those areas.”
Like all areas of photography, food photography takes practice to perfect. Don’t get discouraged by looking at professionally styled photos. Just get out there and try something new. Bon appetit!
Contributors
Do more with Adobe Photoshop Lightroom.
Edit photos easily with Lightroom presets, Super Resolution, easily share photos from any device and access your projects anywhere with cloud photo storage management.
You might also be interested in…
Discover how adjusting shutter speed can help you capture clean shots or motion-filled moments.
Understanding shallow depth of field.
Explore how shallow depth of field can add dimension to your photographs.
How to use and break, the rule of thirds.
Improve your photo composition skills to capture more stunning images.
The art of still life photography
Improve your composition skills by learning the art of still life photography.
