[Music] [Jarrad Seng] Hello. My name is Jarrad Seng. I'm a photographer and director based in Australia. Welcome to my Adobe MAX session. So a bit about me, I've been shooting all around the world for the last 15 years or so, and it's extremely varied work, but over time it's tended to fall within a few main areas, those being portraiture, music photography, where I'll tour the world with different bands, and travel photography where I might be shooting, remote destinations for tourism boards, and across all of those genres there is a type of photography that I particularly enjoy which very creatively going to call low-light photography.
Basically, I love shooting in the dark.
It might be a dimly lit music theater, it might be 2am under the stars, it might be a portrait at dusk. I always am drawn to low-light situations because of the intrigue, the mood, the atmosphere, the drama you can create.
I find that when you have an abundance of light, it's very easy to take a nice image, but that doesn't necessarily mean an interesting one. And I find that once you start taking light away, that's when you have to become a lot more intentional about how you shoot, what your light sources are, what direction the light's coming from, where the shadows are falling. You can really make images your own. It's a lot of fun, but, of course, can be quite challenging and overwhelming at times. You'll end up with a lot of high contrasting images between light patches and dark patches and trying to balance out that exposure. You're constantly fighting your camera settings, trying to let in as much light as possible without making too many trade-offs. And then when it comes to the edit because of the high ISO you've been shooting, you end up with a lot of noise and you have to find ways to deal with that. I'm going to look at three different case studies that are typical low-light situations I'll commonly find myself in, and I think this session will suit beginner and intermediate photographers who already know what they're doing with a camera, but just need that extra little edge to start differentiating your images from the pack. The tools and techniques that I'm going to be talking about today are very simple, very straightforward, and I hope you will learn that that's what editing is. It doesn't have to be this, overwhelming, confusing process. There are very simple ways that you can start turning your images from good ones to great ones. That starts from the shoot, it ends with the edit, and I hope after this session, you just have that little bit more confidence, shooting in low-light. We're going to look at various Lightroom tools across the board, such as exposure adjustments, sharpening techniques, color temperature, but especially, I wanted to highlight some of the newer tools that Lightroom has introduced that are especially helpful in editing low-light images. Those ones being denoise and lens blur. So let's get cracking.
If you're new to low-light photography, it's worth going over a few quick shooting tips. I'm going to try to be brief so we can get to the editing. Now essentially, when we're working with little light, our primary goal is to maximize the amount of light that is reaching our camera sensor. How do we do this? Well, camera setting wise, there's three ways and in this order, this is what I look at, aperture. A wide aperture is key to maximizing light intake. So it's something like f/2.8 is where I'd love to sit or wider. Of course, it depends on the gear that you have available, but essentially the more open you can have your aperture, the better. Slow shutter speeds. We want to slow down our shutter speed to let enough light in. But obviously, the slower you go, the more you deal with shape from the camera, movement from the action. So it's always a little bit of a trade-off, as a lot of things in photography. You just need a little bit of experience trying to find that sweet spot. How slow can you go? Well, a good rule of thumb I use is to double your focal length and that will give you an idea of your minimum shutter speed that you should be shooting at to avoid handshake. So say you're shooting at 40 millimeters, then your shutter speed should hopefully be 180th of a second or faster. ISO, now this totally depends on what situation you're in. Of course, in general, if I'm shooting in the dark situations, 1600 is going to be somewhere where I start, and then I'll push that higher as needed. And of course, it starts introducing noise into your image, but as I'm going to demonstrate soon, noise is actually the easiest thing that I find to deal with, when it comes to post-production. So that's why I set my ISO last because it's the setting that I know I can manipulate the most in post and not affect the image too much.
Tripods, if the situation allows night landscape photography, good tripod is essential. No way around that. Focusing, your camera will often struggle to autofocus in darker situations, so it's always good to have a few workarounds up your sleeve. One of those is manual focus, which is, pretty straightforward to do these days with live view on your camera screen, and you should also learn to focus to infinity when shooting distant objects like the stars. And finally, histogram. Learning how to read the histogram is essential and simple. It doesn't take long. It gives you a clear representation of the shadows, mid tones, and highlights, in your image, and whether you need to increase or decrease your exposure. It's a much more reliable way to see what kind of data is in your image, rather than just guessing from the camera screen.
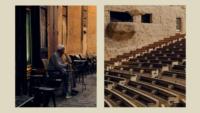
What I love shooting about music is that it's unpredictable, it's a lot of fun, there's a lot of energy on stage, but it can be very challenging too, and most of that is to do with light or your lack of light, your lack of control over the light. And one particular challenge I always face is shooting a large theater or arena where there's a lot of light on stage, but nothing on the crowd or the venue. And the tricky part is, what if you want all of those things in the one image, how do you expose for that, how do you bring out the details in the shadows without over blowing the highlights, and can we do it in a single frame? So this kind of big wide venue shot is a must have when I'm shooting on a tour. There might be 50 different shows in different cities, but actually not much will change night to night apart from the actual venue that we're in. So having that context in an image is essential. So I've pulled up a raw image here from an Angus & Julia Stone concert, shot just a few weeks ago actually, and as you can see, it looks pretty ordinary at the moment and almost unusable, you could say, and I've chose this image for a reason actually because, there are a few imperfections here, there's some lost data, they're in the highlights, but I thought it would be a great case study because in the real world this is the kind of thing photographers deal with all the time, right? We're always a bit rushed or maybe not concentrating in the exact moment, so we do our best to shoot in the parameters that we have, and then we bring the photo up in Lightroom, and we see what we've done wrong, but we have to do our best to deal with it and turn this into something that the band's going to love. So let's break this image down here. We can see now Settings. We've got our Aperture at 2.8, super wide, letting in all the light, a shutter speed at 1/125 of a second. Could have been a little slow if I wanted. ISO 20000, and it gives you an idea of just how dark this room was because if even at 20000 ISO, this, we barely get this amount of detail. It really shows how much we were pushing it. I'm going to bring up the histogram here to examine some more, and we can see that, yes, we have some clipped highlights in these hanging lanterns, and in our shadows there's quite a bit of, lost data there as well. Now if you're a music photographer, you know this is something you come up against all of the time which is that it's actually impossible to choose a single exposure that will capture all of the detail without losing anything. Whatever settings you choose, you're going to clip something. Something could be too bright or something could be too dark. You can't really avoid it unless, of course, you shoot multiple frames and composite them together later. It's not what we're doing here, and I rarely have time for that as well. So it's about finding that happy medium where yes, maybe you lose a little bit of data in the highlights in order to have enough detail in the shadows, enough so that you can balance it all out together and find a good happy medium. As with most edits, I always start in the Light panel and generally it's a good idea to go top to bottom, when editing in Lightroom. I'm going to start with the Exposure slider here.
Take down these Highlights. And very quickly we start realizing that actually we do have a lot of detail that we can work with across the board.
It's just that this minor problem of an ungodly amount of noise that we have to deal with. And I know I just said we're going to go top to bottom, but before going any further, I need to deal with the noise. So I've gone down to the Noise Reduction panel and we're going to try this new feature called Denoise. This amazing new tool in Lightroom is analyzing our image using AI to distinguish between image details and unwanted noise. And we can adjust the Amount applied here.
And we want to find a spot where we have-- We're happy with the texture preserved, but also taking out the noise, and we'll go ahead and click Enhance here. So this tool is actually a perfect demonstration of how knowing your post-processing workflow and tools.
Before you shoot actually changes how you shoot because not so long ago, I wouldn't even have considered taking an image like this, thinking that there's too much noise, there'll be no point, why even bother. Now when you have tools like this, there is a point and I start taking photos that normally I might not give the time of day to. Okay, we have the result here and you can already see how much better this is. It's actually like magic and our global Light tools have done a pretty good job here, but I just want to concentrate on the stage only for now. So what I'm going to do is bring up a mask with a Radial Gradient and start taking down some of the highlights that are coming from the stage.
Just something subtle like that has made a big difference. And our ultimate goal here, of course, is to create a balanced exposure across the board where we see detail, not only shadows, but on the stage and the highlights too. Let's return to our Edit and start tackling Color. And now the cool thing about music photography is that you can go wild if you want... and something like this is actually still quite realistic. There could be purple lights on stage, but for this one, I'm going to keep it pretty close to what it was, and just add a little warmth, and I might even just add some corners to the shadows to add a little bit of color contrast.
So I have noticed that we still have a bit of noise in the corners, especially, and that's partly to do with our lens correction that's being applied, which has fixed the lens distortion you get with wide angle lenses. So I do want to keep that on.
So a nice easy way that we can hide some of that noise is to add a Vignette.
Just subtly, and what that's done is hide these noisy corners in a natural way.
And you know what? I'm actually pretty happy. Right here we could make some more refinements, of course, if we had more time. We don't, and I'm going to stop here because I'm very happy with where it is at the moment. Let's check out that before and after and we can see what a dramatic difference we have made in Lightroom. We've turned it from something that seemingly had an unusable amount of contrast between the lights and the darks, into something that is really nicely balanced across the board. It conveys that lovely warm feeling of being at the theater, and I think the band's going to love it.
There's something very special about shooting landscapes at night. Maybe that's capturing the aurora or shooting the stars. Just using your camera and your vision to reveal or enhance a scene that maybe the human eye can't see itself. It's really rewarding, of course, but can be tricky too. So I've got three quick tips to help you shoot night landscapes. Number one, planning. Now even for a fast and loose guy like myself, experience has taught me that you'll never regret time spent planning. So that means visit your shoot location in the daytime if you can, frame it up, know where everything is, so you don't have to stumble around in the dark. Use apps like PhotoPills to know what time the moon will set and rise, where the Milky Way will be at what time. Two, gear. Good tripod, essential. Head torch, batteries, pocket warmers, a defoggy lens. All of these things are really helpful at night. And finally, think carefully about your framing and your composition because when the light disappears, everything changes. Elements become silhouettes, foregrounds and backgrounds blend together. You need to be really intentional about how you're framing up. Okay, so we have an old image here and this one is from 2016, so 8 years ago, in far North Queensland. And this is a classic case of framing up an image and thinking that's pretty cool, but what can I do to differentiate this from something that anyone else might take? And of course, something I love doing is adding a human element into the frame. Where can we put a human element? Well, the most exciting part will be right there on the tree, obviously, and that person ended up being me as, it usually happens because, my friend who was shooting with me, Melissa Findley, shout out, she was very happy to stay on the ground with the camera and tripod and fair enough. And I will admit that the plan was to get to the top of the tree, but it's a lot harder than it looked and the composition wise it probably works better there as well so we'll pretend like it was always the plan. Let's pull up the camera settings. We have our Aperture at 3.5, nice and wide. Our shutter speed is at 20 seconds and you might say 20 seconds? Why not 30 seconds? Why not let more light in? Well, as I said before there's always a trade-off. And the trade-off this time was, I could not possibly stay motionless, legs wrapped around a tree, holding a phone light in the air for 30 seconds. 20 seconds was already pushing it, so that's why. And ISO we have at 4000 which is pretty high and will introduce some noise, but nothing we can't deal with, and nowhere near as bad as the last image. So let's start with our Light panel again.
Just play around with the exposure slider and find that we actually have quite a bit of detail here in the shadows. It's pretty green and nasty, but luckily I'm actually wanting to keep this image as a silhouette, so we don't have to deal with that. What I do want to do to this image though is increase the contrast and enhance that silhouette feeling. So really highlight the differences between the lights and the darks. And I'm going to do that with an S Curve...
On the Tone Curve. And essentially that's doing the same thing as just using this contrast slider but it's a little bit more precise.
Much of a muchness on this image. Moving on to Color. And I think that color temperature is going to be a pretty important tool here in achieving my vision. I love using a cooler temperature in my night landscapes because it evokes this sense of surrealism, peacefulness, yeah, obviously you could go the opposite way if you wanted, and find yourselves in the depths of hell, but for this one I'm going to keep it cool.
That's looking really nice. I have noticed that here in the corner it's a little over-saturated perhaps, so let's pull out a radial gradient mask once again, and I'm going to use that to only affect this corner, and take down the saturation slightly.
Now you'll notice me using masks a lot in Lightroom. It's such a great tool to quickly, make selective adjustments, so if you don't use masks currently, start getting comfortable with them because they are a game changer. Now let's check out what our noise is doing, and there is some noise there, but it's nothing too crazy. So instead of running it through the AI Denoise this time, let's just use some Manual Noise Reduction to take some of that away, and that's looking pretty good. And while we're down here, I want to show you a sharpening tip as well...
And that is, masking. So rather than apply sharpening across the entire image, we can use masking to only apply it to the areas we want. And if you hold down Option on Mac or Alt on Windows and move this mask slider, it gives you a great visualization of where the sharpness is actually being applied. And what we want to do is keep it to the edges and not the smooth sky areas adding unwanted noise.
And we're actually nearly done. All that's left is a bit of cleanup. And something I noticed when we were zooming in are these red purply hot pixels which are pretty common when you're shooting at really slow shutter speeds. So something we can do to quickly clean those up, is this Defringe tool. We're just going to slide that up a little bit and we can see already that has fixed that up and these hot pixels are now disguised as stars. Of course, we still have a few hidden here in the shadows, and that's where we can bring out some of our Remove tools. I'm going to use the Heal tool on these little guys because they're very minor and easy to deal with. I won't do the entire image 'cause that might take a bit of time, but that's looking pretty good for now.
And the last thing to do is clean up these light patches, so let's use a different remove tool here, Clone stamp I think will be suitable because it's just drawing data from the other darker parts of the image.
Very quick and easy.
And for this part here, I don't think Clone will cut it.
So our old friend, the Radial Gradient...
Mask is coming back and I'm just going to create a gradient only for this little dark patch, take down the Exposure...
And let's fix that one right up. One last bit of cleanup, I can see that horizon isn't quite straight, which is a pet peeve of mine. So we'll just fix that up there.
It's looking a bit better.
And there we go. I'm pretty happy with this image. Let's check out our before and after...
And that's a pretty dramatic difference even though we used very simple tools on this one. So breaking that Edit down, I think you'll agree with me that, the color temperature slider has done most of the heavy lifting here in achieving our mood, and sometimes that's all it is. It's just one slider, one tool that can take your image from what you captured initially to the end final vision. So it can be that straightforward, but we also don't overlook the subtle refinements we can make, such as cleaning up the image, removing distractions, using masks, using selective sharpening, straightening, all of these things that many people won't notice or do, but it's what takes your image to the next level.
So last up we have the moody portrait, very technical name, which is one of my favorite things to shoot. When I first started shooting, I always wanted to shoot in bright overcast light. Everything's nice and soft. You can't go wrong. But as I got a little bit more experienced, it's a lot more fun to experiment with light, low-light, silhouettes, partial silhouettes, and really just start creating depth through shadow. I'm going to pull up this portrait. I shot of an indigenous boy in Broome, Western Australia. Now we were on a film set as you can see here with our light sources being couple fires and LED panel here. I have our subject side lit with the dark side of his face to camera, which is what we call short lighting, and that's a great way to create depth, and mood, and contrast as opposed to lighting from the front.
And a quick side note while we're here, if you ever want to know how someone has lit a portrait, zoom into the eyes, and it will reveal the light sources we have, our fire here, and the smaller one here for the LED panel, the more you know. Anyway, back to the portrait, and first frame I'm already pretty happy, it's looking pretty tight, I did notice these floating embers in the background, and it got my mind thinking, what it'll be 10x at, 100x at, and started throwing logs onto the fire, and you can see in the sequence what a difference that has made. It is created this wonderful texture in the background, all this floating bokeh, beautiful bokeh, and that's actually why I chose this image to work with today because when we shoot in the dark, light sources in the background become more pronounced and striking and this is something we'll specifically play with in a second. But as always we'll start with our Light panel first and play with Exposure...
And I'm actually quite happy with how it is at the moment. I could use a little more detail in the Shadows, and something I'm noticing is that there's some natural fall off of light here on the right, which I'd like, but I want to just make it a little more subtle, so we'll pull up a linear gradient mask to only affect the right side, and I'm going to bring those shadows up just a little touch for a little more consistency across the image.
Okay, moving down to Color, and again, I'm quite happy...
As is so I'm not going to mess with that too much. Let's work on our sharpening.
Where's our details? Here we are. And let's make sure we use our technique, as before, which is to use our mask to visualize where sharpening is occurring, and we only want to affect our edges and not the smooth skin tones and bring any noise there. Now the reason I chose this image is because I wanted to experiment with the new Lens Blur feature in Lightroom. And initially, I was a little skeptical about what use I would have with this tool because I love capturing as much as I can in camera. So why do I want to mess with the depth anymore? Well, maybe you want to introduce more depth to your image that wasn't possible to capture in camera. If I go to our Camera Settings here, you can see I was already shooting at 1.2 so totally maxing out, the amount of depth I have in this image. Or maybe you just initially didn't capture at the aperture you wanted, and you want to play with that depth of field more in post. Now you can do it. So let's scroll down to the bottom and click Apply on our Lens Blur. And what that's doing is using AI to determine the depths of different elements within your image, which you can see here if we visualize the depth.
And you can see how it has separated our subject from the background. Now I have noticed that some of this, adornment has mistakenly been lost into the background, and luckily we have a whole set of tools here which we can use to brush in things back into focus or blur. There's a whole set we can use. I'm going to be quite rough with that and leave that as is. Here we can adjust the amount of blur that is being applied and we want to keep it fairly subtle. Now something else we can do is play with the shape of the bokeh and you can see here some of the different options.
I quite like the look of the cat eye effect which brings a vintage feel and reminds me of this old pets full lens that I sometimes shoot with. And one last thing that I've noticed is that this Lens Blur effect has done a great job of increasing depth, but it has smoothed out some of this natural grain that we would normally expect to see here as we do here on the face. So an easy fix, I'm going to select a new mask. We're going to only affect the background...
Like so. Let's go down to our Effects panel and just increase grain slightly so that it looks a bit more consistent across the board. Few last touch ups to exposure and contrast.
Let's check out our before and after...
And I'm really happy with the adjustments we've made to bring that portrait to life.
So that's all the time we have for today in this Adobe MAX session. Thank you for joining me. Thanks for following along. Hope you learned something, whether that's camera tips and tricks or more about the tools that we can use in Adobe Lightroom to bring your ordinary low-light images to life. I've gone fairly quickly through everything just so we can get through it all. Of course, normally I'd spend a lot longer, refining images, but as you can see in five minutes you can come up with something really great most of the time. Thank you to Adobe for inviting me to host this session. If you want to follow more of my work or hear about new classes, you can find me on Instagram @jarradseng or my website is jarradseng.com Hope you enjoyed that. And see you later. [Music]