video
Keyframe animation for beginners.
Keyframing is a fundamental element of creating animation, effects, and motion graphics. Understand how keyframes are used in Adobe After Effects, Animate, and Character Animator.

What is keyframing?
In the early days of animation, each frame of a production had to be drawn by hand. Now animators can save hours or even weeks or months of work by using digital keyframe animation to identify different elements of a graphic and choose how those elements will move or change over time. To create an action in a digital animation sequence, you first need to define the start and end points for that action. These markers are called keyframes, and they’re used as anchor points for actions in all different types of animation programs, including Adobe After Effects, Animate, and Character Animator.
Keyframe animation basics.
Imagine you want a circle to bounce like a ball across your screen or frame of video. To animate the ball moving from one position to another, set the first keyframe on your animation timeline where you want the ball to start and a new keyframe further along the timeline where you’d like it to land.
Changes you can make with keyframes.
You can trigger more than just position changes with keyframes. Each quality of an animated object that you can adjust with keyframes is called a parameter. These include things like Anchor Point, Position, Scale, Rotation, and Opacity. For movement-based changes like Position or Rotation, you can adjust the parameter values before placing your keyframes by simply clicking and dragging the object.
Types of keyframe interpolations.
The interpolation method is the manner in which you would like the action or movement to be performed. A Bezier or “easing” movement is often a good option because it mimics natural movement well. The object will ease out of the original position and ease into the final position by varying degrees depending on the look you’re going for.
- Linear interpolation: This default creates an even, almost robotic change.
- Hold interpolation: This change occurs suddenly at the next keyframe.
- Bezier or Ease interpolation: This change is based on a movement curve that you can manually adjust.
https://main--cc--adobecom.hlx.page/cc-shared/fragments/seo-articles/after-effects-card
Keyframes in Adobe After Effects
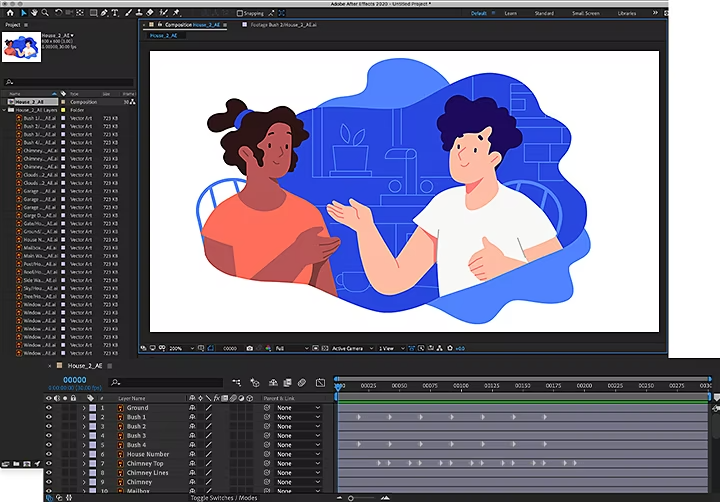
Keyframes are essential to creating animated effects and motion graphics in After Effects. With programs like Animate or Character Animator, you deal with only the animation portion of your production. But with After Effects, you can composite animated elements onto real-world video clips. Learn all about setting, selecting, and deleting keyframes in After Effects or check out a video tutorial to get a quick rundown on creating a motion path.

How to add keyframes in After Effects.
Follow the steps below to add keyframes to a graphic in After Effects:
1. Select the layer you want to animate and click to reveal the Transform parameters for that layer.
2. Choose your parameter or how you want to transform the layer.
3. Move the playhead (the blue marker that indicates where you’re at on your timeline) to where you want to place a keyframe, and place your graphic at the desired starting position or parameter setting.
4. Click the stopwatch next to the chosen parameter to add the first keyframe.
5. Scroll ahead in the timeline and place the playhead where you’d like the action to end. Then place your graphic at the desired end position or end parameter setting to set the second keyframe.
6. So change the interpolation method, right-click on a keyframe, click Keyframe Assistant, and then choose your desired method.
7. To copy a keyframe — for example, if you’d like to add intermediate frames that mimic the action of a previous one — use the Lasso tool to select it and copy and paste it where you would like to duplicate it on the timeline.

Keyframes in Adobe Animate.
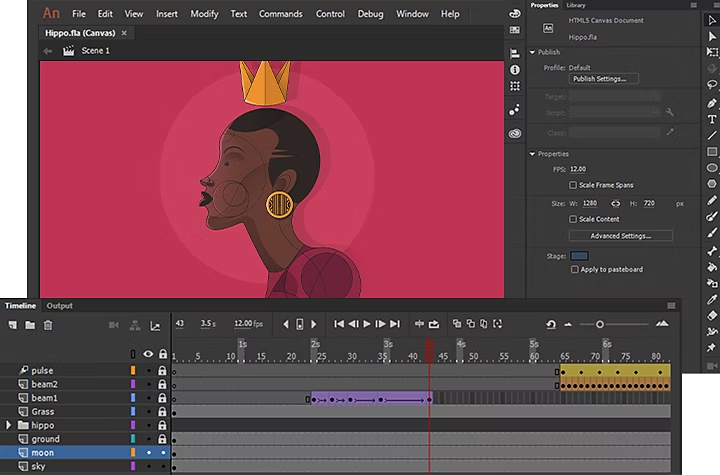
If you’re looking to create an animated 2D clip for a game, TV show, or the web, Animate is the program for you. And just like in After Effects, keyframes are a fundamental piece of animating in Animate. Animation in Animate uses tweened frame spans, which means the frames that span the duration between two keyframes contain an animated element. Keyframes in this app show up as rectangles, not diamonds, as they appear in After Effects or Character Animator.

Get to know keyframes and tweening in Animate.
Before you start your first animation or game design, discover the basics of how keyframes function on the Animate timeline. Then dive into tweening with keyframes in Animate with this tutorial.

Keyframes in Adobe Character Animator.
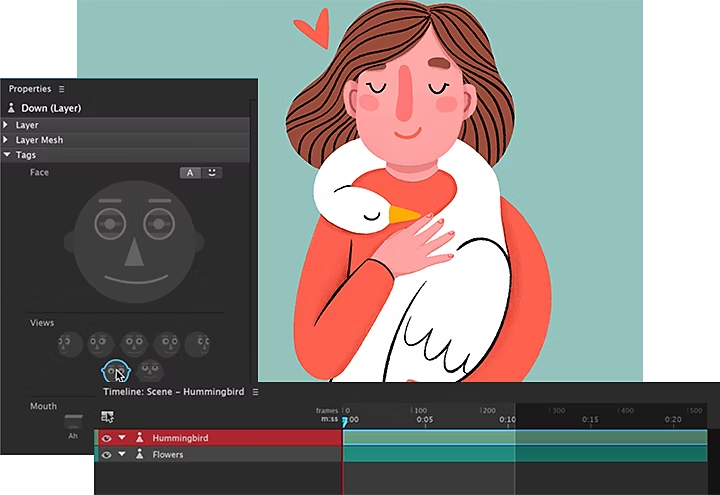
Character Animator uses motion tracking technology to follow your facial movements and expressions through your computer camera and transpose them onto a 2D character or puppet. You can choose to add keyframes to your animation if you wish in order to create more precise movements or movements that would be difficult to achieve with motion tracking. Keyframes in Character Animator appear and behave similarly to those in After Effects.

Combine keyframing with motion tracking.
Get quickly acquainted with how to use keyframes in Character Animator or check out this longer step-by-step video that goes into greater detail about the keyframe process.
Frequently asked questions.
Can you use keyframes in other Adobe programs?
Keyframes and Creative Cloud.
Keyframed sequences are necessary in many different applications, but there are benefits to working in Adobe Creative Cloud. One advantage is the ability to pull in designs from other apps, like Adobe Illustrator and Photoshop, when compositing together different types of media into one video project. Plus, your knowledge of keyframes in one app can carry over into the other apps in Creative Cloud. Adobe makes it easy to apply many different keyframe types and adjust every movement and change to your liking.
