PHOTOSHOP FEATURES
How to change colours in Adobe Photoshop.
Transform a background colour, match clothing to props or even change the hue of someone’s eyes. Replace colours easily with these techniques.
Swap colours several ways with Photoshop.
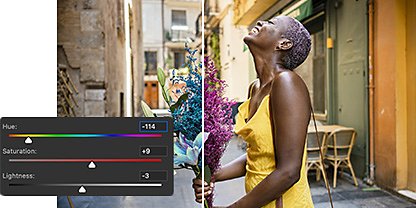
A great way to add style to an image is to apply a different colour to an area to make it stand out. But before you start experimenting with the rainbow, you’ll want to understand the three basic elements that make up colour in Photoshop. Hue describes the colour you are using — like blue, green or red. Saturation describes the intensity of the colour. And lightness is how light or dark the colour is.
Now dive into some ways to adjust hue, saturation and lightness or change the colour of an object in your photos:
Get it just right with an adjustment layer.
Alter a colour in your image easily by adding a Hue/Saturation adjustment layer. This is a non-permanent change you can undo any time.

Add an overall tint with a Solid Colour layer.
To splash on a wash of colour, add a new fill layer. Choose Solid Colour or Gradient, then change your blend mode from Normal to Colour and adjust opacity.

Nix no-no colours from your entire image.
Make permanent, global colour changes via Image › Adjustments › Replace Colour. Use the Adobe Color Picker or HSL sliders to perfect your tweaks.

Paint on new hues with a Brush tool.
Select the Colour Replacement tool by holding down the Brush tool. Then choose the colour you’d like to replace and manually paint over it with a new colour.
Choose which hues to target with your changes.
Photoshop makes it easy to fine-tune which colours you target with replacement. Whether you’re using a Hue/Saturation adjustment layer or working with the Replace Colour tool, you can focus in on either a narrow or wide swath of hues depending on your desired outcome.

Select all similarly coloured objects.
Choose Select › Colour Range to make a more complex, colour-based selection across your entire image. Use the Eyedropper tool to pick a hue to target.

Perfect your Colour Range selection.
When using the Colour Range or Replace Colour tools, adjust the Fuzziness slider to change how wide of a range of colours will be included in your selection.
How to add a Hue/Saturation adjustment layer.
For most projects, changing colour with a Hue/Saturation adjustment layer is the way to go. This adds a non-destructive change to your image, which means your original pixels are intact and you can adjust or remove the change at any time.
1. Mask it:
Apply an adjustment layer to your entire image, which will replace every instance of a certain hue. Or apply it to just one selection using a mask. To choose an object, use the Quick Selection tool.
2. Layer it:
In the Adjustments panel, select Hue/Saturation. This will create a new layer for you to work with. If you had previously selected an object using Quick Selection, your new layer will include a mask that prevents the rest of your image from being affected by the adjustment.
3. Choose it:
Select the colour you’d like to replace by selecting it from the drop-down menu that says Master. Or use the Eyedropper tool to select the colour right from your image.
4. Change it:
In the Properties panel, use the Hue, Lightness and Saturation sliders to change your selected colour. The most dramatic changes, such as turning a blue sky orange, will happen with the Hue slider.
5. Fine-tune it:
There are a few ways to tweak your adjustment to get it just right. Edit your layer mask to add or remove areas from the selection. Tick the box next to Colourise to remove any tints from the previous colour (note that this may remove texture). Use the plus and minus Eyedropper tools to add or subtract hues from your adjustment. Or manually move the markers on the adjustment colour scale to affect a wider range of hues.
To remove or edit your colour adjustment from the Layers panel, right-click (or Control-click) on your adjustment layer and select Delete Layer or Edit Adjustment. To change additional colours, add a new adjustment layer.

Tutorials to help you to colour your world.
Try out some methods for more professional colour matching edits and increasing saturation in isolated areas.
Explore advanced colour matching.
Try this professional product photography technique to apply a new colour to an object in your image. This method lets you add a new colour fill that most precisely matches a specific hue.
Up the saturation in just one area.
Use the Sponge tool to quickly increase or decrease the saturation on only one object. You’ll manually paint on the saturation wherever you need it using your cursor as the brush.
Find the Creative Cloud plan that's right for you.
Photography (20GB)
incl. GST
Lightroom for desktop and mobile, Lightroom Classic, and Photoshop on desktop and iPad.
Learn more
Adobe Photoshop Single App
incl. GST
Get Photoshop on desktop and iPad as part of Creative Cloud.
Learn more
Creative Cloud All Apps
incl. GST
Get 20+ Creative Cloud apps, including Photoshop on desktop and iPad.
See what's included | Learn more
Students and teachers
incl. GST
Save over 70% on Creative Cloud All Apps.
See terms | Learn more
Purchase by phone: 1800 907 119