Add professionalism to clips with video stabilizer technology.
When you’re filming a video, especially if you’re zooming in to get a shot, camera shake is inevitable. Even with the use of a Steadicam, every method to try and get clean shots in camera will require some post-production work. When it comes to video stabilisation software, Adobe Premiere is a really powerful tool — its Warp Stabilizer effect smooths out unwanted camera shake in just a few clicks, with precision fine-tuning so you can get exactly the look and feel you want. Here’s how you can use this effect to stabilise shaky videos shot on your GoPro, smartphone, drone or handheld camera.
A step-by-step guide to stabilising video files in Premiere.
Step 1: Import your media.
- Bring the video clips you want to stabilise into Premiere. You can do this in one of three ways:Select File › Import from Media Browser.
- Right-click the file in the Media Browser and select Import.
- Drag the file from the Media Browser into the Project panel or drag the file from the Media Browser into a timeline.
If you already have an existing sequence, drag the clip you want to stabilise into the Timeline. If not, right-click and select New Sequence from Clip.
Step 2: To maintain good performance, split your clip into the smallest working area.
Warp Stabilizer is a memory-intensive and time-consuming operation. While it lets you continue working in Premiere during processing, it will be a little slower. Once Warp Stabilizer completes the stabilising stage, Premiere returns to the normal state. To help with this, first identify the shaky portion of the footage and then split the clip to isolate those shaky parts. Then, run Warp Stabilizer only on those shortened clips.
To split clips, move the playhead to the points in the tracks where you want to make a split. Make sure the channels you want to split are highlighted. If you want to split the audio with the video, make sure the audio track is highlighted too. Splitting and moving the video without the audio may cause your audio to go out of sync elsewhere.
If you want to split clips where two or more clips or tracks overlap in a timeline, you’ll need to switch to the Expert View Timeline. Drag a marquee to select clips on different tracks that overlap at a point in time. Then, drag the playhead to the frames where you want to make the split.
Use the keyboard shortcut Command/Control + K (for Mac or PC, respectively) or choose Timeline › Split Clip. Now you have two clips from the same file that can be edited independently.

Step 3: Apply the Warp Stabilizer to the shaky clip
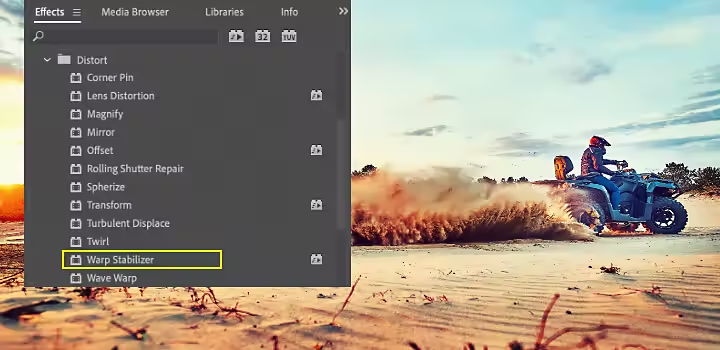
First, select the clip you want to stabilise. Then, in the Effects panel, choose Distort › Warp Stabilizer. Next, apply the effect by double-clicking or by dragging the effect to the clip in the Timeline or the Effect Controls panel.
After the effect is added, analysis of the clip begins immediately in the background. Remember that, depending on the size of your clip, this can take a while. You can watch the progress of the Stabilizer in the Project panel. As analysis begins, the first of two banners indicates that analysis is occurring. When analysis is complete, the second banner moves along to show that stabilisation is happening. You are free to work with the footage or elsewhere in the project while these steps are occurring.
Step 4: Adjust the stabilisation for the look you want.
Once the Stabilizer has finished working, you can examine your work and make adjustments to ensure the video features everything you need to see in the shot.
While the Warp Stabilizer is a smart and powerful tool, you might notice aspects in the stabilised video that you need to tweak. If your clip finishes stabilising and parts of it look woozy or wobbly, it’s been over-smoothed. You can adjust for that. If the stabilising caused you to lose some edge material you wanted, you can also adjust the frame to get it back.
The Warp Stabilizer does its job by tracking different points in the frame and performing complex counter-movements to the footage. This means your frames might rotate, lift, slide over or lower. Or Warp Stabilizer might zoom in to keep your clip edge to edge in spite of these adjustments. If the result is good, you’re done with stabilisation. If you see things that aren’t quite right, here’s what to do:
- Look at the framing. Inspect what the Stabilizer is doing by changing the setting to Stabilise Only under the Framing menu. This displays the entire frame, including the moving edges. Stabilise Only shows how much work is being done to stabilise the image. Using Stabilise Only allows you to crop the footage using other methods. (Note: When selected, the Auto-scale section and Crop Less Smooth More property are disabled.
- Tweak smoothing and cropping. Under Advanced Settings, reduce either the Smoothness or Crop Less Smooth More function. Crop Less Smooth More is much more responsive, as it doesn’t require a restabilise phase.
If those two methods still aren’t enough, you might need to make finer adjustments.

Making fine adjustments to Stabilisation.
Gain greater control over the intended stabilisation result in your video editing by adjusting Stabilisation settings.
Start by using the sliders to adjust the degree of stabilisation and cropping. You’ll see a tradeoff between cropping and smoothing. Lower smoothing values are closer to the camera’s original motion while higher values are smoother. Values above 100 require more cropping of the image. This can result in two types of footage:
- Smooth motion (default): This retains the original camera movement, but makes it smoother. When selected, Smoothness is enabled to control how smooth the camera movement becomes.
- No motion: This attempts to remove all camera motion from the shot. When selected, the Crop Less Smooth More function is disabled in the Advanced section. This setting mimics the look of having set the camera on a tripod. It will produce artefacts (strange, unwanted effects) if your camera was actually in motion, like filming from a car. Smoothing is disabled with this setting.
You can also control the counter movements of the Warp Stabilizer on the frame by adjusting the Method, which uses different tracking to find stability with different degrees of complexity. Each time you make an adjustment, you’ll see that the Stabilisation restarts, but the analysis won’t have to. Here are the methods Warp Stabilizer performs on the footage to stabilise it:
- Position: Stabilisation is based on position data only and is the most basic way footage can be stabilised.
- Position, scale and rotation: Stabilisation is based upon position, scale and rotation data. If there are not enough areas to track, Warp Stabilizer chooses position.
- Perspective: This uses a type of stabilisation where the entire frame is effectively corner-pinned. If there are not enough areas to track, Warp Stabilizer chooses the previous type (Position, Scale, Rotation).
- Subspace Warp (default): This attempts to warp various parts of the frame differently to stabilise the entire frame. If there are not enough areas to track, Warp Stabilizer chooses the previous type (Perspective).
The method in use on any given frame can change across the course of the clip based on the tracking accuracy. Running this edit may take a while.
Lastly, you can control how the edges of the stabilised results appear in the Framing. You have less freedom here than with the other controls, depending on the clip. If you select stabilising that addresses the edges but isn’t related to the rest of the camera movement, you’ll get black artefacts visible in your clip. The default setting here is Stabilise, Crop, Auto-scale. This crops the moving edges and scales up the image to refill the frame. The automatic scaling is controlled by various properties in the Auto-scale section.
Once your clip is ready, you can move on to the next or finish your project and export it. Warp Stabilizer quickly allows you — in a few ways — to find a solution to shaky video footage while preserving some intentional camera movement to keep things natural. It’s what makes Adobe Premiere a great video stabilisation software. No matter how you shoot, you can get after it and then, in post, play around with the settings and sliders until you get the look and feel you want, edge to edge.

