![]()
How to do face swap in photoshop.
Give your photos a little digital love. From backyard snaps to polished portfolio pieces, Photoshop's Face Swap feature helps you turn those nearly-great shots into iconic memories that will last a lifetime.
Give your photos a little digital love. From backyard snaps to polished portfolio pieces, Photoshop's Face Swap feature helps you turn those nearly-great shots into iconic memories that will last a lifetime.
Let's set the scene: You've captured a photo that's almost perfect. Maybe it's a family photo where everyone's smiling except for your cousin who always seems to be mid-sneeze. Or perhaps it's a stunning shot from your latest overseas adventure, but your mate was a bit distracted by the cute local walking by. Photoshop swoops in like a hero, offering its face swap feature as the ideal solution to ensure everyone is looking their absolute best. This feature isn't just about correcting those little slip-ups; it's about crafting the most beautiful version of your memories.
The journey to a seamless face swap begins with precise mask layer swapping. This method ensures the swapped face looks as natural as if it were originally part of the photo. To swap faces using the mask layer technique, follow these steps:

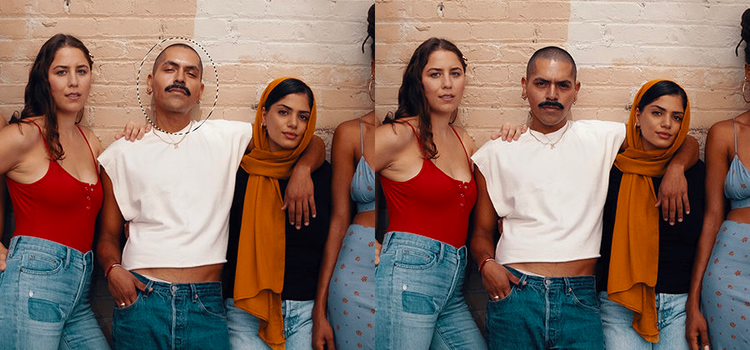
When time is of the essence or when dealing with complex backgrounds, Photoshop’s Object Selection tool is your best friend. To swap faces using this tool, all you’ll need to do is:
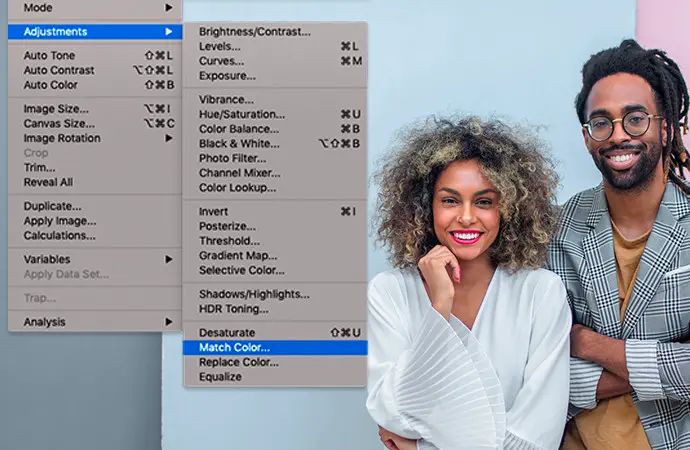
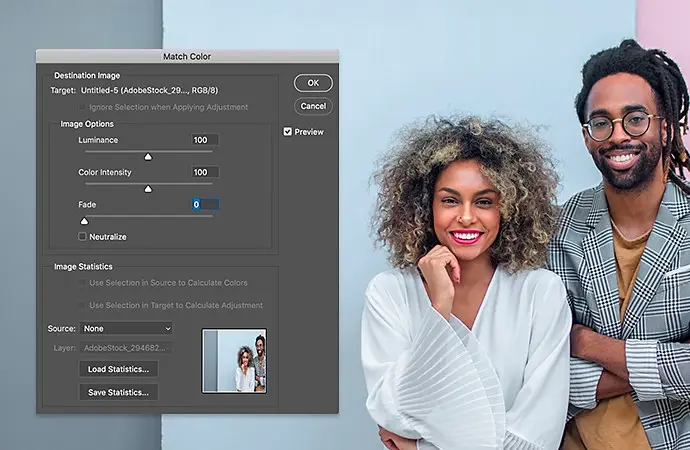
The difference between a good face swap and a great one often lies in the blending and colour correction stage.
The Match Colour feature in Photoshop is your secret weapon in ensuring consistency in the feel of the image. It goes beyond merely matching skin tones; it's about weaving the swapped face seamlessly into its new environment, ensuring that every element looks like it belongs together.
Using Photoshop’s Blur tool isn't just about blurring edges; it's key to integrating elements subtly. The aim is to blend the swapped face with its new backdrop so smoothly that the transition feels completely natural, like it was always a part of the original scene.
Colour correction goes beyond simple tweaks of brightness and contrast. It's about recreating the ambiance, matching the warmth or coolness of the original lighting, and ensuring the face doesn't just fit visually but feels emotionally right.
This is where your attention to detail shines. Observing the subtleties in the original photo's lighting and meticulously adjusting the highlights and shadows on the swapped face can elevate the realism of your work. Think of it as sculpting with light, where each adjustment adds depth and dimension, making the face appear as if it was always part of the original moment captured.
Photoshop's face swap isn't just a tool for correction—it's a canvas for boundless creativity. Whether you're reimagining historical photos with modern faces or creating whimsical compositions that reflect our good ol’ Aussie sense of humour, the potential for creativity is endless.
Face swaps offer a unique opportunity to tell personal stories in an imaginative way. Customised greetings, quirky invitations, or even a series of photos that tell a family story with a twist—these are just a few ways you can use this tool to create something truly one-of-a-kind. It's about adding that personal touch that resonates with people, making your work not just seen but felt.
Expand your creative horizons by collaborating with artists across different mediums. Combine face swaps with digital art, traditional painting, or even interactive installations to push the boundaries of what's possible. These collaborations can lead to exciting projects that blend skills, styles, and visions, resulting in work that is richer and more diverse.
For those in the creative industries, face swaps can breathe new life into advertising campaigns, social media content, or brand storytelling. It's an innovative way to present products, ideas, or messages, ensuring they stand out in a crowded digital landscape. Whether it's for humour, shock value, or pure creativity, these swaps can make your campaign memorable.
Embarking on your Photoshop face swap journey can sometimes be a bit like solving a puzzle; a couple of missteps, and things might not look quite right. But no worries! Here's your handy guide to avoid those common stumbling blocks and ensure your creative process is as smooth as can be.
Even with the perfect alignment and blending, sometimes the swapped face just doesn't seem to "sit" right. It might be the scale, the angle, or even the expression that's slightly off, creating a jarring effect rather than a seamless blend.
Don't hesitate to revisit the basics. Photoshop's Transform tools (such as Warp, Rotate, and Scale) are your allies in ensuring the face fits just as you envision. It's like adjusting your viewpoint to get the perfect shot; a little tweak can make all the difference.
A common oversight occurs when the resolution of the swapped face and the original photo don't match, leading to a face that either looks too grainy or unnaturally smooth.
Ensure both images have comparable resolution before swapping. Photoshop's Image Size dialog box allows you to match the resolution, ensuring the face swap doesn't lose its credibility due to a mismatch in image quality.
Hair, especially when it's flowing or intricately styled, can pose a significant challenge, as can complex backgrounds that make it hard to distinguish edges.
Utilise Photoshop's Refine Edge brush within the Select and Mask workspace to better handle tricky areas like hair. This tool helps in creating a more natural blend, especially around the hairline and similar tricky areas, ensuring the swap looks intentional and polished.
With these troubleshooting tips and solutions, you're well-equipped to tackle common online face swap challenges head-on. Remember, the key to a seamless swap lies in patience, attention to detail, and the willingness to experiment.
Diving into Photoshop's Face Swap tools and features is more than just editing photos; it's about unlocking a treasure trove of creative possibilities. Whether you're aiming to perfect those family portraits, add a twist to your creative campaign, or simply bring a smile to someone's face, each project offers a unique opportunity to enhance your skills and express your creativity.
Regardless of what you want to do, Photoshop provides the tools and flexibility to combine images in whatever way you need.
So, embark on this creative adventure with an open mind and a keen eye for detail. Share your masterpieces, inspire fellow creatives, and perhaps, discover new techniques along the way. The world is your canvas, and with Photoshop's Face Swap, you have all the tools you need to transform the ordinary into something truly extraordinary. Here's to the incredible memories you'll create and the stories you'll tell, one face swap at a time.
Create beautiful images with Photoshop brushes, Content-Aware Fill, Photo effects, Neural Filter, Sky replacement and the many tools photographers rely on.
Explore the Photoshop family of apps.
Based on your location, we think you may prefer the United States website, where you'll get regional content, offerings, and pricing.