
PHOTOGRAPHY
How to add shadows in Photoshop.
Take your art to the next level by imagining a light source and creating some simple shading in Adobe Photoshop.
Easily add shadows to your drawings with Adobe Photoshop.
Even the simplest shadows and highlights can improve an illustration by adding realism and depth. Learn how to visualise light sources and the natural shadows they cast. Then follow these five easy steps to throw some shade of your own, using Photoshop layers and tools to bring a rich new dimension to your work.
If you’re new to illustration or just trying to improve your doodles, it can be daunting at first to add dimension to your drawings. However, there’s a quick and easy way to begin experimenting with shadows and highlights. Even though it’s a very basic way of shading a drawing, it actually makes a huge difference in the overall quality of the image and can make even a quick outline sketch look less flat and more realistic.
If you have an illustration that you’ve created with flat colours — which is to say you haven’t already added shading — follow this easy five-step Photoshop tutorial to create some artistic dimension. It works best with black outlines, but feel free to experiment with all kinds of images.
Of course, this isn’t the only way to add shading to an illustration. Shadow drawing is a whole art unto itself. But it is one simple method that you might find helpful, especially if you’re just starting out in digital art.
It’s amazing how much you can improve an illustration with nothing more than a few simple shading techniques. Begin learning how to draw shadows by following this simple, step-by-step process.


Adding depth to images is all about balancing shadows and light. The image on the left has no highlights and the image on the right has no shadows. Follow the instructions below to learn how to get the balance just right.
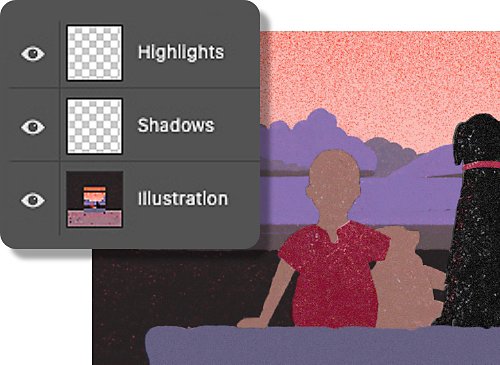
1. Create shadow and highlight layers.
Import your illustration into Photoshop. Open the Layers panel by going to Window > Layers. Create two layers, one for your shadows and one for your highlights. (It doesn’t matter which order you create them in.) On the “shadows” layer, you’ll be drawing in black. On the “highlights” layer, you’ll be drawing in white.
If your drawing isn’t very precise, you might try a medium-sized brush with a low degree of hardness (around 0%) to help make the lighting look soft and natural. If you ever want to erase a line that you created, just use Photoshop’s Eraser tool (with a matching hardness) to remove it.
You’ll need to tone down the opacity (transparency) of these layers in a later step in order to make the lighting more subtle. To make that job easier, you could choose to draw the shadows and highlights at 100% opacity now (that is, completely black and white). But if it’s easier for you to visualise the final product by drawing them on at a lower percentage in the beginning, that will work too.
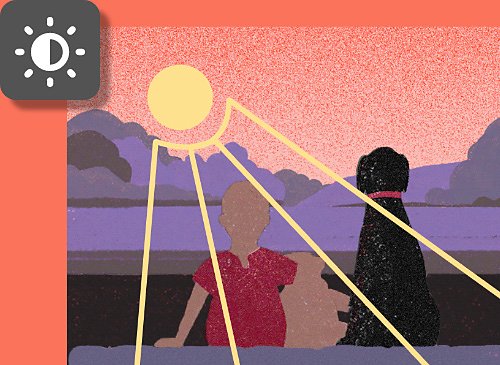
2. Determine the light source and draw your highlights.
The key to making any photo or illustration look realistic is creating realistic lighting. That means you have to know what your light sources are and where they’re coming from — even if they’re not in the picture.
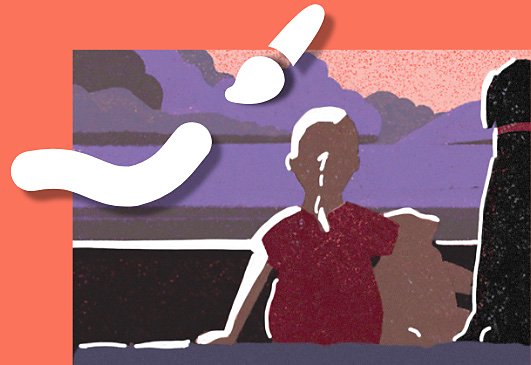
In this scene, for example, you can imagine the character looking out a window with the sun off-screen to the top left. Now that you know the objects are lit from that direction, you can let the light source direct where you draw your highlights. Use the Brush tool to draw a line of highlighting along the top left sides of various objects in the illustration.
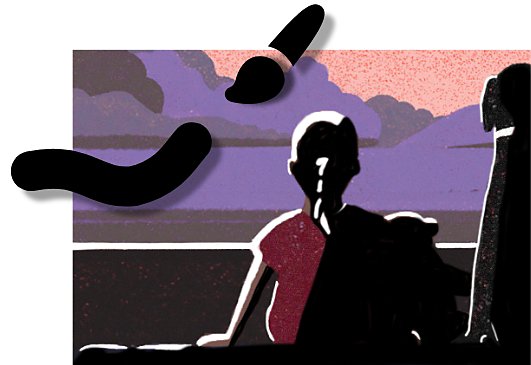
3. Repeat for the shadows.
Using that same technique — imagining the light source in your image — now think about which areas would be cast into darkness. In this example, since you’re visualising the sun at the top left, as a general rule of thumb you’d want to add a line of shadow to the bottom right of each object.
Remember, your shadows don’t have to be straight lines that follow the outlines of your illustration exactly. Fill in entire areas that would be darker, like the shadow a chin creates on a neck, hair creates on a face or eyebrows create on eyelids. Think about which objects would create larger sections of shadow for nonhuman subjects, too.
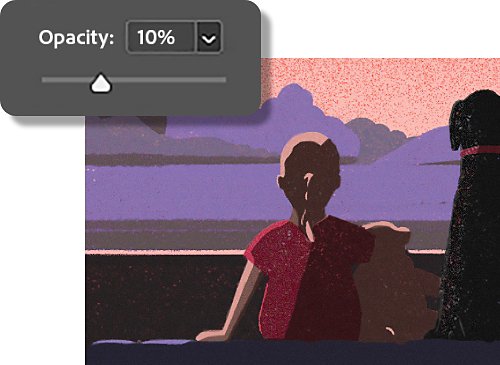
4. Set the opacity for both layers.
If you didn’t already do this in Step 1, go ahead and set the entire opacity of each layer at a level somewhere between 8-20%. A good average might be around 10% for highlights and 15% for shadows.
If you’re working with darker colours, the highlights will be more dramatic so you might want to use a lower percentage like 8. On the flipside, if you’re using mostly light colours, the shadows will appear more obvious so you might want to use a lower percentage for them.
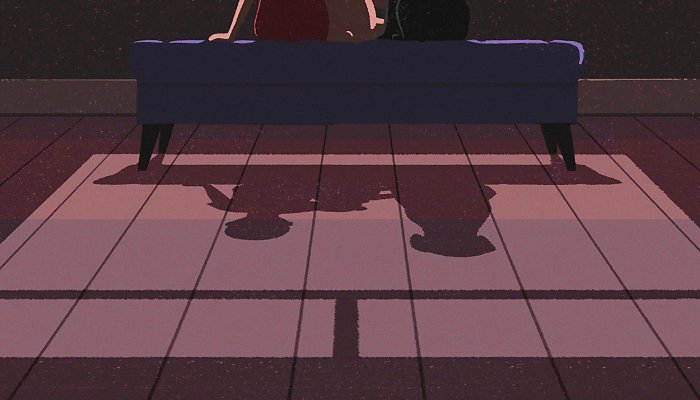
5. (Optional) Create more layers.
Sometimes, having just one layer of shadows and highlights can make them seem too strong in some areas and too subtle in others. To fix this problem, go ahead and create more layers. Use the same steps listed above to create darker shadows or brighter highlights in certain areas. By stacking multiple layers of shadows and highlights, you can create even more dimension and increasingly realistic shading.
Learn more about how to shade digital art.
Now that you’ve been introduced to some basics of how to draw shadows, you may want to learn more about Photoshop’s deep toolbox for shading a drawing.
Learn about drop shadows.
Drop shadows are used to create a 3D effect for two-dimensional images (and even text). You see them everywhere, especially in commercial photography (think product catalogues) and advertising illustrations. They’re also widely used in web page design and general illustration — basically, any time you want to add realism and rich depth to an image.
Create a new layer for your subject for more realism.
Shading a drawing involves separating your subject from its background and then adding a customised shadow. You may want to delete the original background entirely or create a whole new one. Like most everything in Photoshop, this involves creating multiple layers.
Polish up the background.
Then you’ll create a new background layer for the isolated subject. Choose a colour from the cast shadows (the shadows that already appear on the object) with the Eyedropper tool to colour the new drop shadow. This colour will then appear in the foreground layer and you can adjust it using the Colour Picker.
Perfect your drop shadow.
With the isolated object layer selected, use the Drop Shadow dialogue box to select the parameters of your drop shadow, then place it on a new layer of its own. You can apply various Transform, Distort and Blending features to define the drop shadow. Finally, you’ll use the Gradient and Blur tools to further refine it.
Shadow drawing can be complicated, it’s true, but there are plenty of helpful tutorials to walk you through the process. Start by learning the basics of working with layers — a great first step for doing almost anything in Photoshop.
Follow that up with more advanced tutorials and you’ll really be ready to throw some shade.
For a deeper glimpse into the world of digital artwork, watch how popular Dutch artist Lois van Baarle creates her illustrations in Photoshop.
Not sure which apps are best for you?
Not sure which apps are best for you?
Take a minute. We'll help you to figure it out.
Take a minute. We'll help you to figure it out.