video
Raise your EQ IQ: A primer on graphic equalizers.
A graphic equalizer allows you to alter sound by boosting or cutting certain frequencies. Build your knowledge with this introduction, then let your ears be your guide.

Why use a graphic equalizer?
A recording of music or spoken word can pick up a variety of tones, not all of them pleasant. A graphic equalizer (EQ) offers a simple solution: boost or cut (make louder or softer) a specific range of frequencies to improve sound quality. With sliders that move up or down in decibels (degrees of loudness), graphic EQs are so user-friendly they’ve become common features in car audio speaker systems and home theaters as well as recording studios.
How do graphic equalizers work?
Most graphic equalizers divide sound between 6 and 31 bands of frequency, with a physical or virtual slider controlling the volume of each band. If, for example, the treble is too loud on a track, cutting the volume on one or two of the higher frequency bands can soften it. If the bass is shaking the windows, you can just lower the slider of one of the lower frequency bands.
(Frequency — the rate at which a sound wave passes a certain point — is measured in hertz (Hz), which is the number of waves that pass a point in one second. Low notes travel in slow waves, high in fast. The most sensitive human ears can hear roughly between 20 and 20,000 Hz.)
On a 31-band graphic equalizer, the center frequency of each band is one-third of an octave away from the center frequencies of adjacent bands. With so many bands to work with, you can adjust narrow ranges of frequency. On a 10-band EQ, the center frequencies are an octave apart, so each adjustment covers a whole octave of tones. This makes for easy cutting and boosting, but you risk altering frequencies that you aren’t trying to alter.
“The cool thing about graphic EQs is how simple they are,” says producer and engineer Gus Berry. “You can either go up or go down on one of the fixed frequency points. If you boost something and don’t like how it sounds, you can cut it a little bit. If you cut something and all the beefiness to the sound just goes away, you may want to keep that in or even boost it a little more.”

Set limits with high-pass filters and low-pass filters.
These filters are important tools in any good EQ plug-in. A high-pass filter cuts the low frequencies and lets high frequencies pass through, while a low-pass filter does the opposite.
Producer and mixer Lo Boutillette uses high-pass filters to cut the low basses. “We can’t really hear them well anyway, and they can get out of hand and start rumbling your room,” she says. Berry does the same. When he’s mixing a vocal track, he tends to filter out everything below 100 Hz: “The microphone might pick up some subsonic frequencies, and that’s just going to muddy up your mix,” he says. “Even though you don’t hear it, it’s still making the speakers work harder than they have to.”
When mixing drum tracks, Berry uses low-pass filters to avoid snare or symbol bleed. Boutillette, a frequent podcast producer, cautions against setting a low-pass filter too low. The human voice exists mostly between 1000 and 3000 Hz, but sibilance and consonant sounds can reach higher frequencies. “If you pull down your highs,” she says, “there’s always the risk of losing the clarity of a person’s voice. You really have to be delicate.”
When he’s recording vocals, Berry monitors between 2000 and 4000 Hz and cuts a little if it seems harsh. He also looks out for “the honkiness factor,” when voices sound too nasal, which can come into play between 600 and 800 Hz.
Use a light touch when you tweak EQ controls.
Remember that when you’re cutting or boosting a band, you’re not just altering the gain (volume) of the center frequency. You’re boosting or cutting a range of frequencies above and below it. You can change the sound significantly with slight adjustments.
Berry says he rarely cuts more than one or two dB (decibels) because drastic changes can sound unnatural. When deciding whether to boost or cut, Boutillette usually opts to cut, and she says she doesn’t adjust past three dB in either direction.
The most important thing is to use your ears, not your eyes. “If you want a brighter sound,” Berry says, “you might not necessarily want to boost the high end. You might cut out some low muddiness, and that could brighten up your sound. If you’re looking for a darker sound, you may not want to boost any low end. You may want to cut some of the high end.”

For precise frequency tuning, try a parametric equalizer.
Graphic equalizers work well for tuning a full mix of music, but audio engineers tend to use parametric equalizers to pinpoint particular frequencies. “You can choose your center frequency, narrow or widen the bandwidth of surrounding frequencies that are affected, and also adjust the slope of those frequencies,” Boutillette says of parametric EQs.
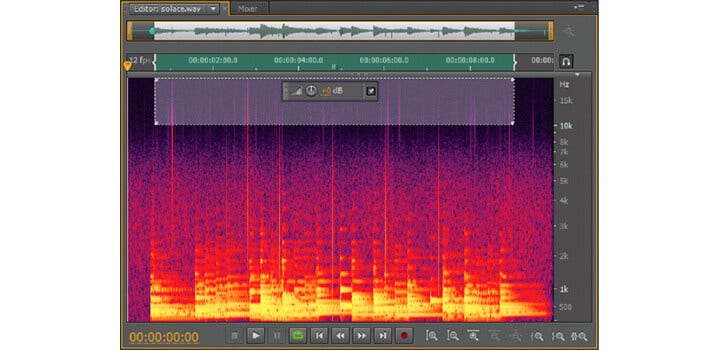
You might also try editing using a spectrum analyzer, which offers a visual representation of an audio file’s frequencies. Brighter colors represent louder sounds, which you can cut with precision.
Graphic EQs work at live performances and in the studio.
Whether you’re at a rock concert or a podcast recording, live performance involves variability in terms of sound reflection, room size and shape, and ambient noise. Boutillette says graphic EQs work well for producing live sound without feedback. “They call it ‘ringing out the room,’” she says. “You want to dampen certain frequencies so you’re not hurting people’s ears.” Berry agrees, “The graphic EQs you’ll see for live sound are a lot more surgical. You can notch out just a couple frequencies as opposed to a whole octave or half-octave.”
Audio systems in recording studios tend to be optimized for recording with sound treatment and well-placed speakers. That means graphic equalizers serve a different purpose in recording than in home stereo sound systems. “In the studio world, graphic EQs are used more often on mid-range instruments, like electric and acoustic guitar,” says Berry. “They have wider bands, which are a little more musical to the ear.”

How can you improve your production and mixing skills?
Start fresh every time.
While some sound engineers use templates for certain types of music, you’re better off starting from scratch with every mix. Each instrument and every voice has a different sound and feel, so you need to listen with an open mind (or ears!) every time you sit down at your digital audio workstation.
Practice.
Becoming an expert at recording and mixing audio takes time and practice. Though he’s been working in audio for years, Berry continues to polish his understanding of the frequency ranges of certain instruments with every mix. “Then you know which areas of those instruments are important to keep intact and which ones can be filtered out or boosted,” he says.
Spend time training your ears and building your knowledge. Keep experimenting with audio equalizers, and your EQ aptitude will grow.
